Easy Sesame Zucchini – Not Really a Recipe

Easy Sesame Zucchini – Not Really a Recipe

This is the fourth post in my new series called “Not Really a Recipe”. These will be non-recipe posts that just give ideas on how to fix meals that are tasty and require very little work.

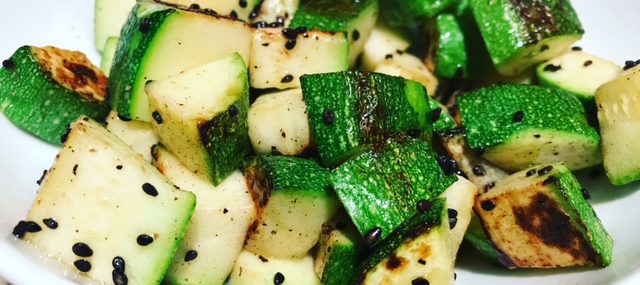
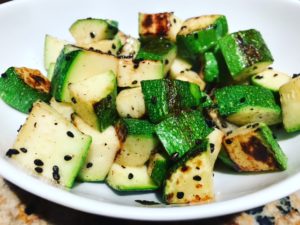
I make zucchini as a side dish all the time. I like how fast zucchini cooks and that it has good texture when the outer skin isn’t removed.

One of my favorite way to make a fast side dish to pair with my lunches is a quick sauté of diced zucchini. This helps me get my extra serving of vegetables in and it’d darn tasty.

Simple dice a zucchini, sauté it in a teaspoon of vegetable oil either in a screaming hot wok, a frying pan or a cast iron pan with a healthy pinch of salt and pepper for about 3 minutes, stirring or shaking the pan to avoid burning. Once cook, add a teaspoon of sesame oil and a half teaspoon of black sesame seeds and toss to coat. I sometimes also make this on the grill using a grill pan!

As the title of this post says, this isn’t really a recipe, it’s just a tasty way to change up the way you cook this inexpensive and tasty veggie.

Cheers,

Veronique     

Grilled Turkey Wrap – Not Really a Recipe

Grilled Turkey Wrap – Not Really a Recipe

This is the third post in my new series called “Not Really a Recipe”. These will be non-recipe posts that just give ideas on how to fix meals that are tasty and require very little work.

I make wraps for lunch all the time. I fill them with tasty things like avocado, artichoke hearts, heirloom tomatoes and more…the options are endless. I do get to a point where I’m sick of the same old wraps so when that happens, I grill them in my Panini press!

Today I used spicy humus as my ‘glue’ instead of fatty mayo and topped it with sliced turkey, sliced provolone cheese, dried cranberries and pickles. All the ingredients were tucked inside a sundried tomato wrap. Little veg oil on each side, 2 minutes in the hot Panini press and voila – a crunchy on the outside and melty on the inside hot wrap!

Hope this helps break up your monotone lunches a bit!

Cheers,

Veronique

Double Avocado Toast – Not Really a Recipe

Double Avocado Toast – Not Really a Recipe

This is the second post in my new series called “Not Really a Recipe”. These will be non-recipe posts that just give ideas on how to fix meals that are tasty and require very little work.

This dish is perfect for lunch, brunch or cut into slices for an appetizer. The dish is made using grain-filled bread that’s buttered and lightly toasted then topped with my Zesty Guacamole recipe, slices of avocado, cilantro leaves and edamame. Right before serving, I squeeze some lime juice on. Simple to make and boasting big, perfect flavors.

Let me know if you try this!

Cheers,

Veronique

Easy Cheesy White Grits

Easy Cheesy White Grits

Easy Cheesy Grits

I make creamy polenta all the time, but for some reason, I don’t make southern-style cheesy grits that often. Some would say that polenta and white corn grits are the same thing, but for me, polenta is made using fine to medium ground yellow or white corn and southern-style grits are simply coarsely ground bits of white corn. In my polenta, I like to add Parmesan cheese. In my grits, I use sharp Cheddar.

This recipe yields four side dishes or two entrée portions of grits. You can eat them on their own of top them with sautéed shrimps and hot sauce.

Ingredients:

  • 3 cups water
  • 1 cup white corn grits 
  • ½ tsp. sea salt
  • Pinch of black pepper
  • 4 Tbsp. softened butter
  • 1 cup shredded sharp Cheddar cheese
  • 4 tsp. softened butter, optional

Grits Cooking

Directions:

  • In a deep saucepan, bring the water to a boil over high heat. Lower the heat to medium-low and add the grits in a slow, steady stream. Whisk to break up any lumps then add the salt and pepper. Cook for 5 minutes, stirring often to prevent scorching, then cover the pan and allow the grits to rest with the heat off for 5 more minutes.
  • Add the 4 tablespoons of butter and the cheese to the grits and stir until fully incorporated and creamy.
  • Top each of four servings with a teaspoon of soften butter, or each of two servings with 2 teaspoons, if using.

Cheers,

Veronique

Salmon with Avocado Mash – Not Really a Recipe

Salmon with Avocado Mash – Not Really a Recipe

This will be the first in a new series I’m going to do called “Not Really a Recipe”. These will be non-recipe posts that just give ideas on how to fix meals that are tasty and require very little work.

This dish is one I eat often…..blackened salmon topped with my Zesty Guacamole recipe. I use good quality salmon, sprinkle blackening seasonings on it, sear in a very hot cast iron pan, squirt some lime juice on and top with the guac. Simple, low-carb and most importantly, very tasty.

Let me know if you try this!

Cheers,

Veronique

Phyllo Easter Pie

Phyllo Easter Pie

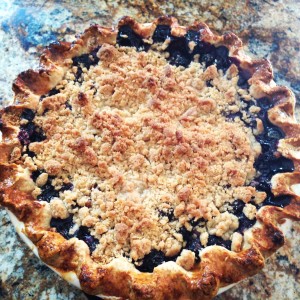
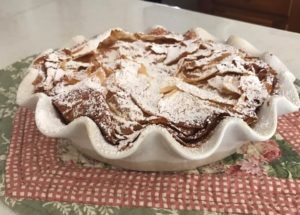
My friend Linda posted this gorgeous pie photo on Facebook that she made for Easter that I’m glad she shared the recipe for with all of us! I love phyllo dough so this recipe called my name. She uses extra powdered sugar, so have to love that!

Ingredients:

  • 1 cup powdered sugar, plus extra for garnish
  • 3 large eggs
  • 1½ tsp. pure vanilla extract
  • ½ tsp. orange extract
  • Zest of 1 orange, about 1 Tbsp.
  • 1 (15-­ounce) container whole milk ricotta cheese
  • ½ cup cooked short­-grain rice, like arborio
  • 1/3 cup toasted pine nuts
  • 10 sheets fresh phyllo sheets or frozen, thawed
  • ¾ stick (3 ounces) unsalted butter, melted

Directions:

  1. Preheat the oven to 375 degrees F.
  2. Blend 1 cup of powdered sugar, eggs, vanilla, orange extract, orange zest and ricotta in a food processor until smooth. Stir in the cooked rice and pine nuts. Set the ricotta mixture aside.
  3. Lightly butter a 9-inch glass pie dish. Lay 1 phyllo sheet over the bottom and up the sides of the dish, allowing the phyllo to hang over the sides. Brush the phyllo with the melted butter. Top with a second sheet of phyllo dough, laying it in the opposite direction as the first phyllo sheet. Continue layering the remaining sheets of phyllo, alternating after each layer and buttering each sheet. Spoon the ricotta mixture into the dish. Fold the overhanging phyllo dough over the top of the filling to enclose it completely. Brush with the remaining melted butter.
  4. Place the pie plate on a cookie sheet to catch any drips and bake the pie until the phyllo is golden brown and the filling is set, about 45 minutes (if golden brown after 35-40 minutes, remove from the oven). Transfer the pie to a cooling rack and cool completely. Sift the reserved powdered sugar over the pie and serve.

Serves 8.


Recipe adapted from this Giada De Laurentiis recipe.

5 Best Bacon Recipes

5 Best Bacon Recipes

It’s been said that bacon makes everything better. I must agree with that statement…porky, fatty, salty…what could be better (vegan/vegetarian friend refrain from comments!).

Here are 5 of the best bacon-centric recipes on my blog for you to try this weekend.

Bonus recipe (I know it’s pancetta you purists): Spaghetti alla Carbonara

Leave me a comment after you’ve tried these!

Happy eating,

Veronique

Spinach Dip Mozzarella Sticks

Spinach Dip Mozzarella Sticks

Photo by Etienne

My brother-in-law, Etienne, enjoys experimenting in the kitchen and trying new dishes when at restaurants. I really love that about him! This past week, he decided to try one of those Buzzfeed’s Tasty video recipes for Spinach Dip Mozzarella Sticks. How great does that sound!!? It’s like two of my favorite appetizers in one!

Ingredients:

  • 8 ounces cream cheese, softened
  • ½ cup cooked spinach, drained
  • 2 cups shredded mozzarella cheese
  • 1 tsp. kosher salt
  • 1 tsp. freshly ground black pepper
  • 1 tsp. garlic powder
  • 2 cups all-purpose flour
  • 4 large eggs, beaten
  • 2 cups seasoned breadcrumbs
  • Canola oil, for frying
  • Marinara sauce for dipping, homemade or store-bought

Directions:

  1. In a medium bowl, combine the cream cheese, spinach, mozzarella, salt, black pepper and garlic powder, stirring until thoroughly mixed. Transfer the cream cheese mixture to a baking sheet lined with parchment paper and spread it. Freeze for 30 minutes.
  2. Transfer the frozen spinach mixture onto a cutting board and peel off the parchment paper. Slice the block into 1-inch wide strips, then slice the strips in half into sticks.
  3. Place the flour, eggs and breadcrumbs into three separate bowls. Dip the spinach dip sticks into the flour, then the eggs, then the breadcrumbs, then back into the eggs, and finally back into the breadcrumbs. Set the breaded sticks aside on a plate.
  4. Heat oil in a pot over medium-high heat. Fry the breaded sticks for about 30 seconds to a minute, until golden brown.
  5. Cool and serve with marinara sauce.

Serves 15–20


Recipe by Tasty.

Top 5 Pies for Pi Day

Top 5 Pies for Pi Day

Streusel Top Blueberry Custard Pie

Today, 3/14, is Pi Day and to help celebrate this special day, I’m sharing a list of the top 5 pies I’ve posted on my blog.

Chocolate Silk Pie

Maple Syrup Pie

Maple Bourbon Pecan Pie

Key Lime Pie

Streusel Top Blueberry Custard Pie

Hope you try baking one of these and if so, that you let me know your thoughts!

Cheers,

Veronique

Vegetarian Chili Stuffed Red Bell Peppers

Vegetarian Chili Stuffed Red Bell Peppers

I’m still on my mission to try to stick to vegetarian dishes on #MeatlessMonday and since I’d make a double batch of my Vegetarian Black Bean and Butternut Squash Chili a month ago and it was calling my name from the freezer, I decided to use that delicious concoction in a stuffed pepper dish.

Since I defrosted about 3 cups of chili, I used the remaining two cups for a southwestern lasagna and I’ll share that with you next week.

These stuffed peppers are fab as a take to work lunch as they’re really simple to microwave from the office kitchen. They’re also great paired with a salad dressed with some tasty, zesty dressing (perhaps my Easy Greek Vinaigrette) for a light dinner.

Ingredients:

  • 1 large red bell pepper (if green or yellow peppers are cheaper, go for them)
  • 1 cup brown or white rice, cooked
  • 1 cup grated Cheddar cheese, plus 2 reserved tablespoons
  • 1 cup vegetarian chili (could be store-bought_

Directions:

  1. Preheat oven to 350 degrees.
  2. Remove the pepper stem and cut the pepper in half lengthwise. Remove any seeds and extra membrane from the inside of each half.
  3. Place each pepper halves, cut side down, in a baking dish and cook in the oven for 20 minutes. Allow to cool for a few minutes so the pepper is cool enough to handle.
  4. In a large bowl, combine the rice, the cup of cheese and the chili.
  5. Spoon the chili mixture inside each bell pepper half and return to the baking dish. Top each pepper half with a tablespoon of cheese and bake for 20 minutes.

Serve with a side salad. Yields 2 servings.


Vegetarian Chili Stuffed Red Bell Peppers
Serves 2
These stuffed peppers are fab as a take to work lunch as they’re really simple to microwave from the office kitchen. They’re also great paired with a salad dressed with some tasty, zesty dressing (perhaps my Easy Greek Vinaigrette) for a light dinner.
Write a review
Print
Prep Time
15 min
Total Time
1 hr
Prep Time
15 min
Total Time
1 hr
Ingredients
  1. • 1 large red bell pepper (if green or yellow peppers are cheaper, go for them)
  2. • 1 cup brown or white rice, cooked
  3. • 1 cup grated Cheddar cheese, plus 2 reserved tablespoons
  4. • 1 cup vegetarian chili (could be store-bought)
Instructions
  1. 1. Preheat oven to 350 degrees.
  2. 2. Remove the pepper stem and cut the pepper in half lengthwise. Remove any seeds and extra membrane from the inside of each half.
  3. 3. Place each pepper halves, cut side down, in a baking dish and cook in the oven for 20 minutes. Allow to cool for a few minutes so the pepper is cool enough to handle.
  4. 4. In a large bowl, combine the rice, the cup of cheese and the chili.
  5. 5. Spoon the chili mixture inside each bell pepper half and return to the baking dish. Top each pepper half with a tablespoon of cheese and bake for 20 minutes.
Notes
  1. Serves 2.
Food & Wine Chickie Insider https://www.foodandwinechickie.com/
Cheers,

Veronique