Old York Cellars Cod with Vegetable Sauce

Old York Cellars Cod with Vegetable Sauce

As families prepare for another socially distanced Easter and Passover meal, some may be looking for ways to make their holiday a bit more special this year.

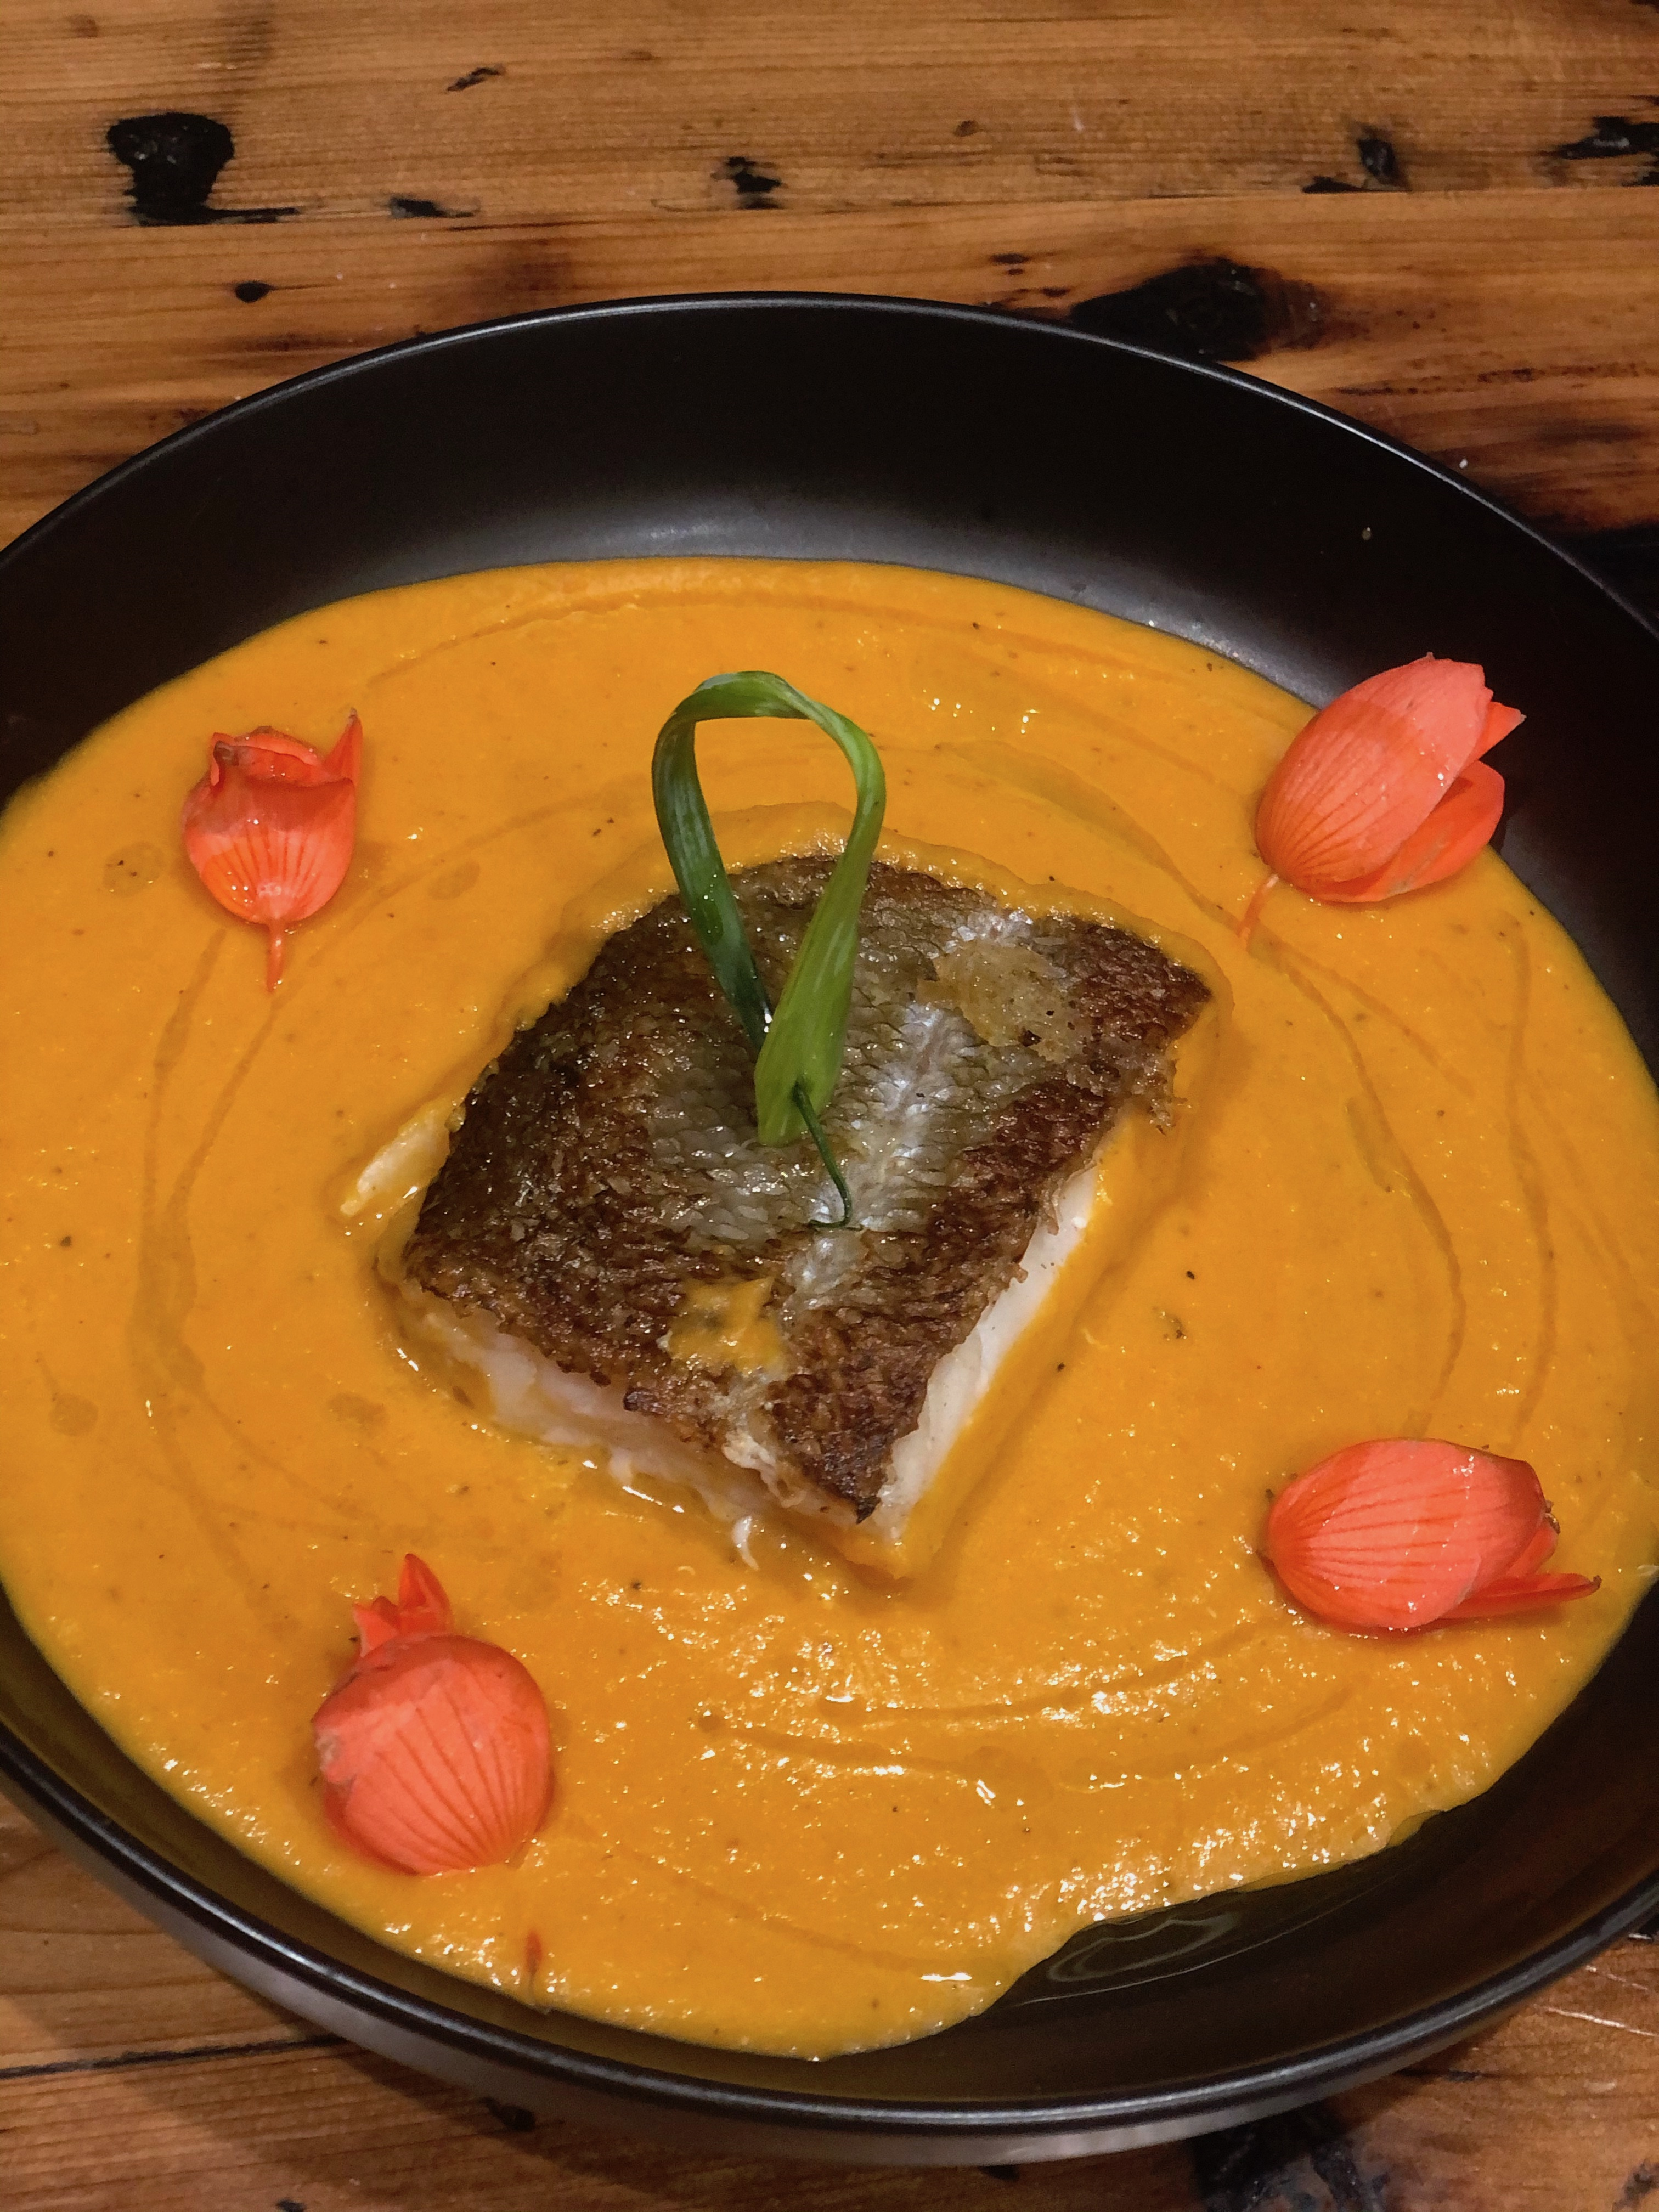
Old York Cellars Chef Jose Diaz has prepared this easy, DIY recipe for cod for two that offers the perfect touch for an Easter or Passover meal to be remembered.

You’ll see that the recipe calls for Old York Cellars dry white wine and that’s available for purchase at the winery’s website. The recipe also features a Old York Cellars Malbec Marinara, a sauce hand-made by Dogwood Farms in Hillsborough NJ using Old York Cellars Malbec – yum!

Photo by Old York Cellars

Ingredients

  • 1 russet potato – peeled
  • 4 Tbsp. olive oil, divided
  • 1 celery stalk – chopped
  • 1 carrot – chopped
  • 1 leek – sliced
  • 1 onion – chopped
  • 1 tomato – chopped
  • 2 garlic cloves – minced
  • 1 red bell pepper – chopped
  • 1 ½ tsp. each salt and freshly group black pepper, divided
  • 1 Tbsp. paprika
  • ½ cup Old York Cellars dry white wine
  • ½ cup Old York Cellars Malbec Marinara
  • 1 tablespoon fresh parsley
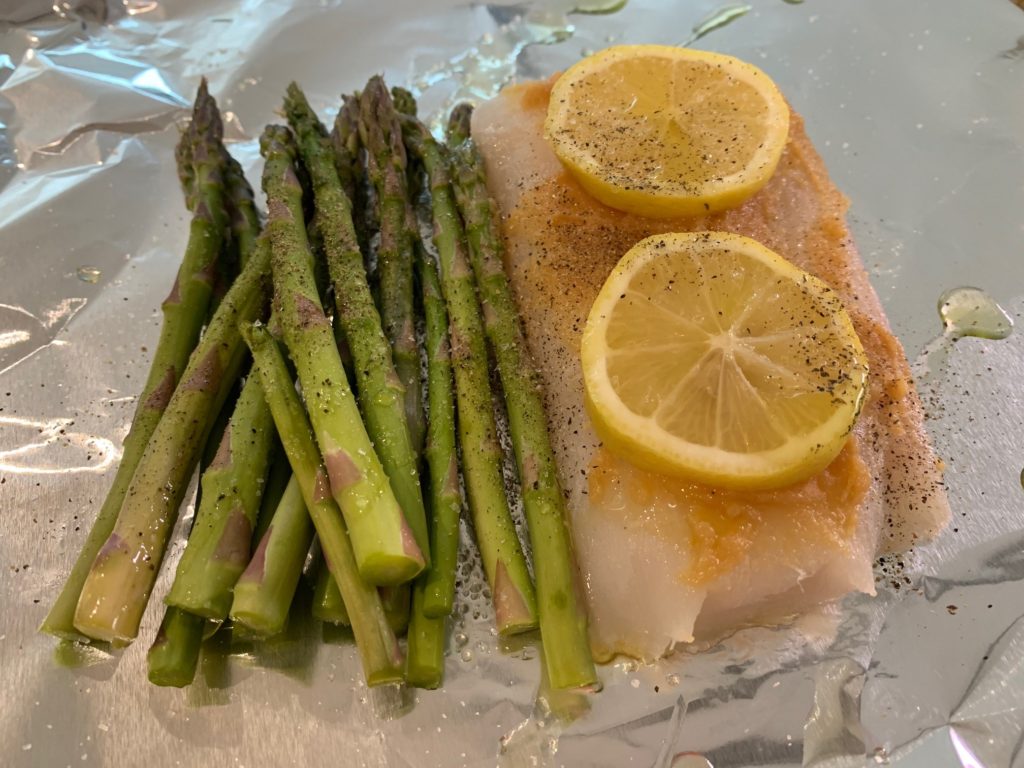
  • 6-ounce filet with skin on

Directions:

  1. In a pot of boiling water, cook the potato for 35-45 minutes, or until tender. Remove from the water and let stand 3 minutes then slice.
  2. Set a medium-large pot over medium-high heat and once warmed, add one tablespoon of olive oil. After 30 seconds, add the celery, the carrots, the leeks, the onion, the tomato, the garlic and the red pepper. Stir for a minute then add two more tablespoons of olive oil over vegetables along with one teaspoon each of the salt/pepper, and the paprika. Cook for 5 minutes, stirring occasionally, then add the wine and marinara sauce. Decrease heat to low, cover the pot and allow the sauce to simmer for 25 minutes, stirring occasionally.
  3. Once the saucy vegetables are cooked, purée the mixture until smooth using either an immersion blender or a food processor.
  4. Put the pureed sauce through fine mesh strainer using a rubber spatula (optional if you want).
  5. Return pureed and strained (if straining) vegetables to the pot and simmer over low heat while the fish is being sauteed.
  6. Season the cod with the remaining salt and pepper.
  7. Place frying pan on stove over high heat. Add remaining two tablespoons olive oil to the pan and warm up. Once oil begins to shimmer, add the cod, skin side down and cook for 5 minutes until cod begins to firm up and turns slightly white.
  8. Remove cod from pan and place skin side up into the vegetable purée and cook for an additional 10 minutes.
  9. To serve, spoon two tablespoons of vegetable purée onto a plate and swirl around the plate with the back of the spoon.
  10. Add cooked potatoes over the vegetable purée then place the cod skin side down on potatoes and add more sauce to plate.
  11. Garnish with fresh parsley and drizzle with olive oil.

Serves 2.

About Old York Cellars

Set amidst some of the oldest vineyards in the Garden State, Old York Cellars is a working farm that offers a full selection of award-winning wines and an extraordinary experience both inside and outside of the tasting room. The winery plays host to a variety of special events and exciting programs including seasonal Wine Festivals, Music Under the Stars, Comedy Nights, Specialty Tasting Experiences, and the exclusive Vintner’s Club.

Winery in Ringoes Open Daily 12 – 5 PM  (Starting April 3rd the winery will be open until 7 PM)

Old York Cellars Winery & Vineyards, 80 Old York Road, Ringoes, New Jersey 08551, Phone:  908-284-9463

Old York Cellars Tasting Room & Restaurant, Quaker Bridge Mall, Route 1, Lawrenceville, NJ, Phone:  609-799-2707

Old York Cellars Wine Shop, Bridgewater Commons Mall, 400 Commons Way, Bridgewater, NJ, Phone:  908-722-2222

Creamy Chicken Noodle Soup

Creamy Chicken Noodle Soup

At our home, we love soup. If we’re connected on Facebook or Instagram, you’ll see lots of soup pics, especially in the winter. I’m Canadian and my guy is Dutch, two countries big on soups, and while we each have favorites, this Creamy Chicken Noodle Soup is one we both love.

Every so often when I have a few hours of downtime in the house, I’ll simmer or roast a whole chicken and then take the meat off the bones and bag individual portions and freeze for quick weeknight meals and for soup. For this soup, I do a double bag, about two cups. I’ll then simmer down the chicken carcass and make broth that I also freeze for future use, like this soup.

In this soup, you could use leftover rice or pasta for a great way to clear up the fridge with no waste. I often use linguine or fettucine. If you don’t have a blender/stick blender, simply skip that step and you’ll have a lovely soup that’s a bit chunkier. The soup gets its lovely coral color from the cooked carrots.

Ingredients:

  • 2 Tbsp. vegetable oil
  • 3 medium carrots, diced
  • 1 medium yellow onion, diced
  • 4 stalks celery, diced
  • 2 garlic cloves, minced
  • 8 cups low-sodium chicken broth
  • 1 tsp. each dried thyme, salt and pepper
  • 1 cup heavy cream combined with 1 Tbsp. cornstarch
  • 2 cups diced/shredded roasted chicken
  • ¼ pound linguine, broken into 2” pieces

Directions:

  1. In a large stockpot warm the oil over medium heat. Add the carrot, onion and celery and sauté until tender, about 10 minutes, stirring occasionally. Add the garlic and continue cooking for another minute.
  2. Add chicken broth, thyme, salt, pepper and cook for 10 more minutes.
  3. Add half the soup to a blender (or use a stick blender) and purée for about a minute. Return the puréed soup to a clean saucepan and purée the second half of the soup and add to the 1st batch of puréed soup.
  4. Turn the heat to medium and add the cream/cornstarch mixture to the soup. Bring to a simmer and cook/stir for 3-4 minutes until the soup has thickened.
  5. Add the pasta, lower heat to medium-low and cook 10-15 more minutes, until the pasta is cooked through. If using cooked pasta or cooked rice, reduce the cooking time to 2 minutes instead of 10-15 minutes just to reheat the cold pasta/rice.

Serves 6 generously.

Vegan Fudge with Walnuts

Vegan Fudge with Walnuts

Yes, you read that recipe title correctly – VEGAN! My dear friend Sharon’s been living a vegan, unprocessed foods lifestyle for a while now and posts recipes of foods she’s reinventing as vegan that always look tasty and interesting. This past week, she posted a recipe I finally decided to try and post here as it’s perfect for the upcoming holidays – Vegan Fudge!

Photo Credit: Diane Biancamano

The recipe was created by amazing vegan chef/recipe creator/food blogger Dianne Wenz. Dianne and I ran in some of the same circles both being New Jersey food bloggers, before I relocated to Charlotte. Her popular food blog, Dianne’s Vegan Kitchen, is filled with fantastic recipes and tips for adopting and living a vegan lifestyle.

Two things attracted me to this recipe: 1) the fudge looks creamy and velvety 2) the recipe calls for homemade dairy-free condensed milk – WHAT!!?? If find all this intriguing and fantastic.

Photo Credit: Sharon Lewis

Here’s Dianne’s recipe for Vegan HOMEMADE VEGAN FUDGE (WITH DAIRY-FREE CONDENSED MILK). The recipe calls for walnuts, which I think are a must in fudge, but please skip if you don’t like them or if there are food allergies in your homes.

I cannot wait to make this for the holidays and hope you give it a try too!

Cheers,

Veronique

Cheesy Bacon Chicken Bake

Cheesy Bacon Chicken Bake

While baked chicken recipes can be boring and sometimes even bland, this easy weeknight Cheesy Bacon Chicken Bake recipe is just the opposite.

It came to me as we were trying to empty our freezer and fridge before our move out of state. We had some chicken breasts in the freezer, that I thawed, and a block of cream cheese and some pre-cooked bacon to use up, so the Cheesy Bacon Chicken Bake was born.

This low carb recipe comes together in mere minutes and is perfect for weeknights or an easy weekend dinner. You could add things like cubed ham instead of bacon or add cooked spinach or cooked mushrooms and it would be delicious. The shredded cheese you use can also be changed to Swiss or Colby or Jack, or whatever you have on hand.

The chicken can be served with rice or a side salad for those living the keto life.

Ingredients:

  • 4 boneless, skinless breasts halves, sliced in half horizontally (you’ll have 8 pieces)
  • 1/3 cup mayonnaise (I used Duke’s)
  • 8 ounces cream cheese, softened
  • 2 cups shredded sharp Cheddar cheese, divided
  • ½ tsp. each salt, pepper and garlic powder
  • 8 slices cooked bacon, chopped into bite size pieces
  • Chopped scallions, optional

Directions:

  1. Preheat the oven to 375 degrees.
  2. In a rectangular baking dish (I used an 11’x7” Pyrex) place the chicken breasts in an even layer (a bit of overlap is fine).
  3. In a medium bowl, combine the mayo, cream cheese, 1 cup shredded Cheddar, the spices and chopped bacon.
  4. Top the chicken with the cheese/bacon mixture then top that with the rest of the Cheddar.
  5. Bake for 35-40 minutes or until the internal temperature of the chicken is 165 degrees and the cheese has melted and is lightly golden.
  6. Garnish with the scallions, if using.

Serves 4.

Mediterranean Spinach and Feta Quiche

Mediterranean Spinach and Feta Quiche

I recently hosted a Greek-themed dinner party when I overbought a ton of ingredients (surprise surprise). With a buttery pie crust in the freezer, lots of sautéed spinach, Feta cheese, eggs and red onions on hand, I decided on a Mediterranean quiche!

Quiches are so versatile as they’re a great way to use up leftovers. This version is a vegetarian quiche but adding cooked bacon, leftover roast chicken or diced ham would also be great.

I think the crust is the most important part of a good quiche and I provide the EASY way to make a fail proof crust below where you put all the ingredients in the food processor and let it do the work – try it!

You’ll see that I added some Mozzarella for that cheesy stringy pull but replacing with all Feta would also work well.

Ingredients:

  • 1 pie crust, homemade or store-bought
  • 1 Tbsp. vegetable oil
  • ½ medium red onion, thinly sliced
  • 6 large eggs
  • 1 cup heavy cream
  • ½ tsp. each salt, freshly cracked pepper and oregano
  • Big pinch of ground nutmeg
  • 2 cups cooked spinach, squeezed dry
  • 1 cup crumbled Feta cheese
  • 1 cup shredded Mozzarella cheese

Directions:

  1. Preheat oven to 375 degrees.
  2. Add the pie crust to a 9″ pie plate and place in the freezer for 15 minutes.
  3. In a medium sauté pan over medium high heat, add the oil and sliced onion. Cook stirring frequently until the onions have softened, about 4 minutes. Take the pan off the heat and allow to cool for 10 minutes.
  4. In a large bowl, whisk together the eggs, cream and the spices for 60 seconds.
  5. Top the pie crust with the sautéed onion, then the spinach, then the Feta and then the Mozzarella. Place the pie plate on a baking sheet in case of spills. Carefully pour the egg mixture over the cheeses and place the quiche in the oven to bake for 40-45 minutes. The quiche is done when the center is no longer giggly. If the surface of the quiche browns quicker than the allotted time, cover loosely with foil.
  6. Allow to cool 15 minutes before serving. The quiche is great at room temperature.

Makes 6-8 servings.

Easy Root Vegetable Salad

When the weather cools off, I roast vegetables almost every Sunday. Depending on what looks good at the market, I roast beets, various squashes (butternut would be my favorite), Brussels sprouts, turnips, carrots and more. Little drizzle of olive oil, thyme, salt and pepper and into the oven we go. I find that having these cooked veggies on hand during the week can be used in so many different applications from soups to simple side dishes to pastas and in salads.

This isn’t really a recipe, but more of a reminder that root vegetables can be amazing during the week as a salad. I use a pretty bowl and add a variety of veggies, some cheese– this time it was goat cheese crumbles, maybe some dried cranberries and chopped almonds….and a killer tangy dressing, like my Easy Greek Vinaigrette. Give it all a toss and voila, a delicious meal.

Hope this post gives you some new ideas for weekday lunch salad meals.

Cheers,

Veronique

No Stick Grilled Sockeye Salmon

At my home, we love to grill. This undoubtedly comes from living in South Florida for 20+ years before relocating to NJ. There, we grilled several times a week and we’ve continued that now that we live in the northeast.

One thing I love to grill is fish. No mess in the kitchen, no fishy smell for several days – easy peasy! I know what typically intimidates folks about grilling fish is that it can stick and be a huge disaster. It really doesn’t have to be that way.

First, there are many products on the market you can place your fish on when grilling. Everything from a cedar plank to a silicone mat to a rectangular grill pan.

Second, pick the ‘right’ fish. As a starting point, salmon is a great fish to grill as you can place on the grates skin side down which help protects the flesh from sticking.

Third, put the fish on the medium-hot grill, close the lid and leave it alone! The fish needs time to form an outer ‘crust’ which will make it way easier to flip or remove from the grill, but in order for that to happen, you need to leave it alone to cook for a bit!

Finally, one of my favorite tricks to ensure fish won’t still to the grill is to place the fish on lemon slices. The lemon helps protect the fish from the direct grates and also flavors it as it cooks. A winning recipe in my book!

Ingredients:

  • 1 ½ – 2 pounds of sockeye salmon (I use a whole side)
  • Juice of one lemon
  • Olive oil for coating
  • Pinch of salt and black pepper
  • Zest of one lemon
  • 8-10 slices of lemon
  • 2 lemons, halved (optional)

Directions:

  1. Light a grill to medium-high heat. Allow the grill to get up to temperature with the lid closed.
  2. Place the salmon skin side down on a work surface or platter. Pour the lemon juice and the oil then add the salt, pepper and zest and massage that mixture all over the flesh of the fish.
  3. Open the lid of the grill and place the lemon slices, two side by side, horizontally on the grill grates (see pic for a visual). Place the salmon skin side down onto the lemon slices. Close the grill lid and cook for 8-10 minutes, until the flesh is firm but not dry. If using, place the four lemon halves, flesh side down, on the grill for the last 5 minutes of the fish cooking time.
  4. Remove the fish from the grill, peel off the skin (this will be very easy after grilling) and serve with a squeeze of the grilled lemons.

Serves 2-4 depending on your side dishes.

Easy Miso Cod en Papillote

Easy Miso Cod en Papillote

It feels wrong to even call this a recipe, but, if I don’t document it, I’ll forget how tasty it is and that I should make it more often! It’s even keto-friendly!

This is a very simple process and prefect for a weeknight meal of cod cooked in an aluminum foil packet on the grill. No oven to turn on, no messes to clean up!

I had wild caught cod on hand but this would be delicious with many non oily fish like mahi mahi, bass, sole, halibut or haddock. I had miso paste in the fridge so I used some of that along with lemon juice and olive oil, but some ginger dressing or even some Italian dressing would work great also.

Ingredients:

Two 4-6 ounce cod filets

2 Tbsp. each miso paste, olive oil and lemon juice

4 slices of lemon, seeds removed

20-30 raw baby asparagus spears

Salt and pepper

Uncooked Fish Packet

Directions:

Turn your gas grill to medium flame (or turn the oven on to 375 degrees).

Cut two large pieces of aluminum foil and lay them on a work surface. Lightly coat each foil piece with cooking spray.

Place a cod filet and 10-15 asparagus spears in the center of each of the foil pieces. Spoon the miso paste over the fish then drizzle the fish and asparagus with olive oil then lemon juice. Season with a big pinch of salt and pepper. Place two slices of lemon over each fish filet then wrap the foil tightly over the fish and asparagus to create an air tight packet.

Place the foil packets on the grill, close the grill lid and cook for 15 minutes. Carefully remove the packets from the grill using a large spatula and equally carefully unwrap the foil packets.

Dish can be served right in the foil packets or transferred to a plate for a low carb meal. We served ours with basmati rice.

Makes two servings.

Lobster Mac and Cheese for Two

When I go through the trouble of making lobsters for dinner, I always make an extra one for leftover lobster recipes later. One of my favorite, most decadent, way to use cooked leftover lobster is to make lobster mac and cheese. It’s luxurious, delicious and a perfect food.

I’ve taken my usual large batch lobster mac and cheese recipe and recreated it for two people. I bake the pasta in individual, perfect-sized, baking dish.

Note that this could also be made using cooked shrimp or no seafood at all.

Topping Ingredients:

  • 1 Tbsp. butter
  • 2 Tbsp. Panko breadcrumbs (could also use standard breadcrumbs but the topping will be less crunchy)
  • Pinch of cayenne pepper

Pasta Ingredients:

  • Meat of one cooked 1 ¼ – 1 ½ pounds lobster
  • 4 Tbsp. butter, divided
  • 2 Tbsp. all-purpose flour
  • Big pinch each, salt and pepper
  • ½ cup heavy cream
  • 1 ½ cups whole milk
  • 1 ½ cups extra sharp Cheddar cheese, freshly grated
  • ½ cup grated Parmesan cheese
  • ½ pound elbow macaroni, or other tubular pasta, cooked 2 minutes less than recommended in package directions, drained

Topping Directions:

  1. Microwave the butter until melted and bubbly, add the Panko and cayenne and combine well. Set aside.

Pasta Directions:

  • Preheat oven to 400 degrees.
  • In a small saucepan over medium-low heat, melt 2 tablespoons of butter then and add the lobster meat. Warm for 2-3 minutes, tossing the lobster in the butter to coat and warm evenly. Set aside.
  • Place the remaining 2 tablespoons of butter in a medium saucepan over medium heat and allow to melt. Add the flour and cook for 2 minutes, whisking constantly to create a roux. Season with salt and pepper.
  • Stir the heavy cream and the milk into the butter/flour roux and bring to a simmer. Cook the sauce for 2-3 minutes, whisking often, until thick and bubbly.
  • Slowly add the cheeses, a handful at a time, and stir until fully incorporated, about 2 minutes.
  • Add the cooked pasta to the cheese sauce and mix well.
  • Gently fold in the lobster meat and the butter it was cooked in (why not?).
  • Add cheesy pasta to two individual baking dishes (could use one larger baking dish).
  • Sprinkle with the Panko mixture and bake pasta for 15 minutes until panko mixture has lightly browned. Serve at once.

Makes 2 servings.

Chocolate Chip and Walnut Pie

If you’ve followed this blog or my social media posts for a while, you’ll know I’m a huge fan of pies. From berry to citrusy to chocolatey pies, I like them all (not pumpkin, never pumpkin).

This pie, originally published by Nestle Toll House, is pretty amazing as it combines chewy, fudgy chocolate chip cookie texture inside a buttery, flaky crust. I used classic walnuts in this but please use whatever nuts you like. Pecans or macadamia would be particularly awesome.

If the thought of making your own pie crust stops you from trying this recipe, simply use a store-bought pie shell.

Ingredients:  

  • 2 large eggs
  • ½ cup all-purpose flour
  • ½ cup granulated sugar
  • ½ cup packed brown sugar
  • 1 ½ sticks butter, softened
  • 1 cup semi-sweet chocolate chips
  • 1 cup chopped walnuts (could use other unsalted nuts)
  • 9” deep-dish pie shell, unbaked (use this homemade fail-proof crust recipe or use store-bought)
  • Good quality vanilla ice cream (optional but recommended)

Directions:

  • Preheat oven to 325 degrees F.
  • In the bowl of an electric mixer, beat the eggs of medium-high speed until light and fluffy, about 2 minutes.
  • Add the flour, granulated sugar, brown sugar and the softened butter and beat to fully incorporate into the egg mixture.
  • Add the chips and walnuts and blend to just combine.
  • Add the mixture to the unbaked pie shell.
  • Bake the pie for 55 to 60 minutes or until toothpick inserted in the center of the pie comes out clean. Cool on wire rack.
  • Serve warm with ice cream (if using).

Pie serves 6-8.