Chocolate Cappuccino Cheesecake

Chocolate Cappuccino Cheesecake

Day 2 of “12 Days of Baked Goods”

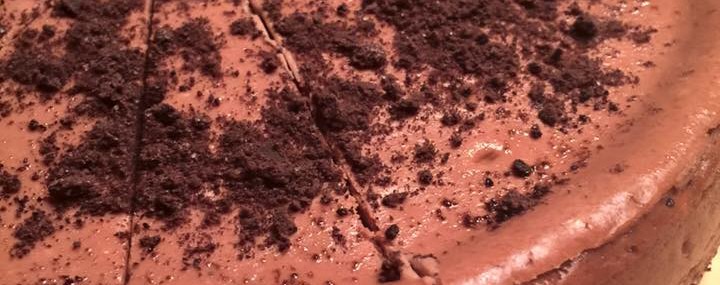
Last week, I spent Thanksgiving with my friend Diane Biancamano and her family. I’m typically the person who gets assigned desserts for parties, but Diane’s a super baker and I was thrilled to be able to sample the decadent Chocolate Cappuccino Cheesecake she made.
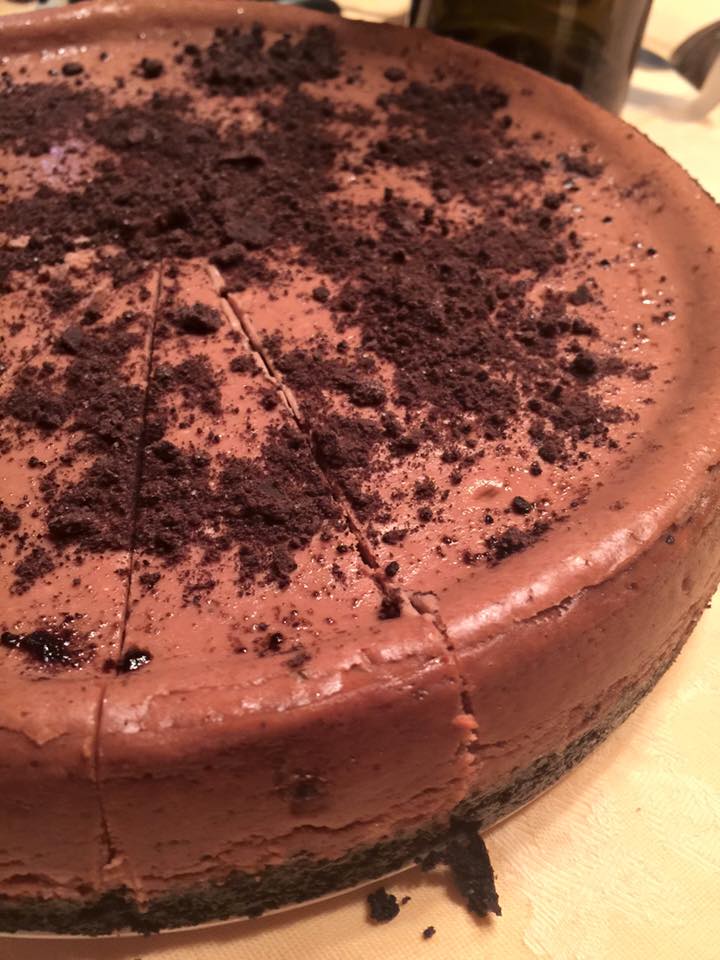
 CheesecakeIngredients:

  • 1 cup chocolate cookie crumbs
  • ¼ cup butter, melted
  • 1 cup plus 2 Tbsp. granulated sugar
  • ¼ tsp. ground cinnamon
  • 3 8-ounce packages cream cheese, softened
  • 3 large eggs
  • 8 1-ounce squares semisweet chocolate
  • 2 Tbsp. whipping cream
  • 1 cup sour cream
  • ¼ tsp. salt
  • 2 tsp. instant coffee or Espresso granules dissolved in ¼ cup hot water
  • ¼ cup coffee flavored liqueur (Kahlua, Bailey’s, etc…)
  • 2 tsp. pure vanilla extract

Directions:

  1. Preheat oven to 350 degrees.
  2. Butter (or coat in cooking spray) the bottom and sides of a 9” springform pan.
  3. In a medium bowl, combine the chocolate wafer crumbs, the melted butter, 2 tablespoons granulated sugar and the cinnamon. Mix well and press all but 2 tablespoons of the crumb mixture onto the bottom of the springform pan, reserve the 2 tablespoons of crumbs for later use. Set aside.
  4. In the bowl of an electric mixer, beat the cream cheese until smooth, about 2 minutes. Gradually add the remaining 1 cup of granulated sugar, mixing until well combined. On low speed, add the eggs, one at a time until very smooth, about 2 minutes.
  5. In a medium bowl set over a pan of simmering water, melt the semisweet chocolate with the whipping cream until smooth, about 3 minutes. Don’t let the bowl touch the water!
  6. Add the melted chocolate to the cream cheese mixture and blend well. Stir in the sour cream, the salt, the coffee, the coffee liqueur and the vanilla and beat until just smooth, about 1 minute. Pour batter into the springform pan.
  7. Bake in the middle of the oven for 45 minutes. Note that the center of the cheesecake will be soft but it will firm up as it chills. Allow the cake to cool in the oven with the heat turned off and with the door ajar for 45 minutes. Remove cake from the oven and refrigerate for 12 hours.
  8. Sprinkle the reserved crumb mixture over the cheesecake before serving. 

Yields 16 servings. Recipe inspired by All Recipes. Cheers, Veronique

Apple Pear Pie

Apple Pear Pie

Today begins my “12 Days of Baked Goods”.

Apple Pear PieLast week, my Facebook (and likely yours too) sort of blew up with all kinds of fantastic food photos from my friends and family. While many dishes looked incredible, one that especially caught my eye was my friend Marge Imms’ Apple Pear Pie. While I tend not to love apple pie, I like pears a lot, so I thought this combo would be perfect!

Many thanks to Marge for sharing this recipe she found in Southern Living from November 1998 and modified to her liking.

Ingredients for the apple/pear mixture:

  • 6-7 Granny Smith apples (Gala or Rome apples may be substituted for Granny Smith)
  • 6-7 Bartlett pears (Bosc or Anjou pears may be substituted for Bartlett)
  • 2 Tbsp. lemon juice
  • 1 cup granulated sugar plus 1 tsp.
  • ½ cup butter
  • 1 egg with a little water, whisked to combine
  • Two 9” pie crusts, homemade or store-bought

Apple/pear mixture directions:

  1. Preheat oven to 425 degrees.
  2. Place the bottom crust into a 9” pie plate, place in the refrigerator.
  3. Peel and thinly slice the apples and pears
  4. Put butter and 1 cup of sugar in large skillet and melt over medium heat.
  5. Put in the apples/pears and cook about 5 minutes.
  6. Transfer the apples/pears with a slotted spoon over the crust in the chilled pie plate, leaving the sugar/butter mixture in the pan.
  7. Cover with top pie crust and brush pie top with egg wash and sprinkle the teaspoon of sugar.
  8. Bake for 30-35 minutes, until the pie is golden brown.

Caramel sauce directions:

  1. Continue cooking the butter/sugar mixture for about 10 minutes more.
  2. Serve pie slices with caramel sauce and whipped cream (optional)

Cheers,

Veronique

Mini Speck Frittatas

We’re often told that breakfast is the most important meal – I’m a complete believer of this notion. What I don’t believe in is the idea that, with our busy lives, we have the time each morning to make breakfast from scratch. With that in mind, I often make crust-less frittatas on a Sunday to last me through the week and I’m always looking for fun variations. This week’s Frittatas special ingredient – Speck Alto Adige PGI.

Speck Alto Adige PGI is a cured and smoked Italian ham from Northern Italy’s Alto Adige region. The ham is similar to Prosciutto in appearance and alike to slab bacon in flavor – an outstanding, very versatile product. A few weeks back, the fine folks at Speck Alto Adige PGI contacted me about creating a recipe using their ham and I gladly accepted. I’m officially the November ‘Speckulator’ as named by Speck Alto Adige PGI! Here’s the recipe I created using the top-quality ham I received from Speck Alto Adige PGI. These are GREAT to have on hand during the holidays!

Ingredients:

  • 1 cup Speck Alto Adige PGI, cubed or julienned
  • 12 large eggs (one egg per Frittata)
  • ¼ cup water
  • ½ tsp. each salt, pepper and smoked paprika
  • 1 cup shredded sharp cheddar cheese

Directions:

  • Preheat the oven to 350 degrees.
  • Generously coat a 12-muffin pan with cooking spray.
  • In a large frying pan over medium-high heat, sauté the speck until slightly caramelized, about 5 minutes, stirring occasionally. Remove from the heat, set aside and allow to cool.
  • In a large mixing bowl, whisk the eggs with the water, salt, pepper and paprika until fully blended, about 1 minute.
  • Divide the speck and the cheese among the 12 muffin cups.
  • Pour an equal amount of the egg mixture into the muffin cups over the speck and cheese.
  • Place the muffin pan on a sheet tray, to catch any drips, and bake for about 20 minutes, or until the egg is set.
  • Let the Frittatas cool in the pan for about 5 minutes then unmold and allow to cool completely. Store in an airtight container.

To reheat, place two Frittatas on a plate, cover with a paper towel and microwave for 60-90 seconds. I like to top the Frittatas with a little green salsa. Makes 6 servings (2 Frittatas each). For more information about Speck Alto Adige PGI, for recipes and for where to buy the ham, visit http://www.speck.it.   Cheers, Veronique

5 Simple Thanksgiving Side Dishes

Yorkshire Puddings

Yorkshire Puddings

This is the time when we start planning our holiday menus and creating our invitation lists. With Thanksgiving right around the corner, I thought I’d share with you some easy-to-make, popular side dishes that have graced my dinner table during the holidays so you might gain inspiration from them for your own party or for that special side you’ve committed to bringing for turkey day.

Corn and Lima Bean Succotash

Duck Fat and Bacon Fingerling Potatoes

Easy Roasted Brussels Sprouts

Easy Vegetable Tian

Fail-Proof Yorkshire Puddings

What are some of your Thanksgiving favorites?

Cheers, Veronique

Basil Freezing Technique

Basil Freezing Technique

This year, I had an unbelievable basil harvest in my garden boxes. Typically, I turn a bunch in pesto and freeze that tasty green paste for comforting bowls of pasta throughout the winter.

This summer, I had so much basil that I opted to simply puree some with olive oil and freeze in ice cube trays to be used in soups and stews. The technique is easy:

  • Remove all the basil leaves from the stalks then wash the leaves and dry them thoroughly using paper towels.
  • Add the leaves to a food processor and puree with olive oil until an almost smooth puree is created. For every cup of fresh basil leaves, use about a tablespoon of olive oil.
  • Pour a couple of tablespoonful of puree into the wells of an ice cube tray. Place the ice cube tray in the freezer and freeze for 8 hours or overnight.
  • Remove the frozen puree from the ice cube tray and place in freezer-safe re-sealable bags in the freezer until ready to use.

If you decide to try this technique, please post a comment on this post!

Cheers,

Veronique

Cacio e Pepe

Cacio e Pepe

Cacio e PepeI think my love for Cacio e Pepe, literally “cheese and pepper”, steams from enjoying buttered spaghetti with Parmesan cheese when I was a kid. What could be more simple yet satisfying than hot pasta with melted butter, freshly-cracked pepper and cheese?

Ingredients

  • 8 Tbsp. butter, divided
  • 1 Tbsp. freshly-cracked black pepper
  • 1 pound dry Spaghetti, cooked 2 minutes short of package direction, 1 cup pasta cooking water reserved (I use Delverde pasta)
  • 1 cup finely grated Parmesan
  • 1 cup finely grated Pecorino

Preparation

  1. In a heavy saucepan over medium heat, melt 4 tablespoons of butter.
  2. Add the pepper and cook, stirring a few times, 1 minute.
  3. Add the reserved pasta cooking water to the butter in the saucepan and bring to a simmer.
  4. Add the cooked pasta and the remaining 4 tablespoons of butter and reduce the heat to low.
  5. Add the Parmesan cheese and gently toss until melted. Remove pan from heat.
  6. Add the Pecorino cheese and gently toss until melted.
  7. Serve in warm bowls.

Serves 4.

Harvest Tomato Sauce by Bracco Farms

Last week, when I received my Bracco Farms CSA box, I was a bit overwhelmed with the huge share of gorgeous tomatoes I received. Considering I have a healthy harvest of my own tomatoes, I was a bit weary of what I’d do with all those beauties – I love tomatoes, but one can only consume so many in a week’s time!

The lovely Christa at Bracco Farms, without prompting, must have a read my mind and asked if I needed a quick and easy tomato sauce that freezes well for any extra tomatoes I might have…YES!!!!!!!!!!

Here’s a simple sauce recipe Christa shared with me. It was exactly what I was looking for.

Chop the large tomatoes into chunks, the cherry tomatoes into halves and put them all together in a big pot. 

Drizzle a fair amount of olive oil (or any oil) over them with some salt.  DO NOT COVER OR ADD WATER.  Bring to a simmer.  Simmer for about ½ hour to release some of the natural water.

Cool and then freeze for the winter!

Please post a comment if you use this simple recipe for your extra harvest tomatoes.

Thanks,

Veronique

Ants on a Log

Ants on a Log

Ants-On-A-LogToday’s National Ants of a Log Day. Yes, “they” even have a national day for this. Growing up in Canada, I never heard of this snack until we moved to the States when I was 12 years old. By then, I wasn’t really into the concept, so it never caught on at my home.

According to Wikipedia, “Ants on a log is a snack made by spreading cream cheese or peanut butter on celery and placing raisins on top. The snack name was first used in the 1950s”.

Curious to see how it would taste, I spread Peter Pan Peanut Butter (don’t hate, I know it’s commercial and not organic) on some celery I had left then topped with the required raisins and…it was actually pretty tasty!

Did you grow up eating this popular snack? Do you like it?

Best,

Veronique

Vegetarian Stuffed Eggplant

Vegetarian Stuffed Eggplant


I try to abide by my #MeatlessMonday promise when I can and am always looking for ways to use more vegetables in my diet so this weekend, I found beautiful mauve round eggplants that I prepared two ways – meat-stuffed and vegetarian.

These single-serve eggplants are great to fix on the weekend to bring for work lunches during the week. They’re also beautiful served as a starter at a dinner party and a breeze as they can be made in advance and reheated in time for dinner.

Ingredients:

  • 2 cups cooked Spanish rice, homemade or commercial (I used Goya brand Arroz con Tomate)
  • 4 ounces crumbled Feta cheese
  • ½ tsp. dried mint
  • 2 Tbsp. golden raisins
  • 4 Tbsp. Easy Greek Vinaigrette
  • Two small mauve round eggplants (or any small round eggplants)
  • ½ tsp. sea salt
  • 1 Tbsp. olive oil

Directions:

  1. Preheat oven to 350 degrees.
  2. In a medium bowl, combine the rice, Feta, mint, raisins and 2 tablespoons of Greek Vinaigrette. Set aside.
  3. Using a paring knife and a teaspoon, remove the very top of the eggplants and then remove most of the pulp from the interior being careful not to pierce through the outer skin. See photo as reference.
  4. Rub the sea salt on the inside of each eggplant.
  5. Fill the cored eggplants with the rice stuffing then drizzle with the olive oil.
  6. Place the stuffed eggplants in a Pyrex baking dish with tall sides. If the eggplant won’t stand up straight, use a crumpled piece of foil to create a small “stand” for them.
  7. Bake for 30 minutes and either serve hot or at room temperature with a drizzle of the remaining vinaigrette.

Serves 2.

Easy Greek Vinaigrette

Easy Greek Vinaigrette

Greek VinaigretteIf you’ve been following this blog for a while, you know I LOVE Greek food. As such, I make this simple vinaigrette all the time and literally use it on everything.

Ingredients:

  • ½ cup extra virgin olive oil
  • ¼ cup red wine vinegar
  • 1 Tbsp. Dijon mustard
  • ½ tsp. each salt, pepper and Oregano

Directions:

In a glass jar with a tight-fitted lid, add the ¼ cup of oil, the vinegar, the mustard and the remaining salt, pepper and the Oregano. Close the lid and shake vigorously. Alternatively, whisk all the ingredients in a small bowl. Refrigerate for up to 3 days if not using right away.

Cheers,

Veronique