Chocolate Chip and Butterscotch Banana Bread

Chocolate Chip and Butterscotch Banana Bread

Baked BreadI’m not sure why, but seeing overripe bananas and having to toss them hurts me. I’m also not sure why, but spending $10 on ingredients required to make banana bread to save $0.50 worth of bananas doesn’t bother me at all.

Chips and Flour

Chips and Flour

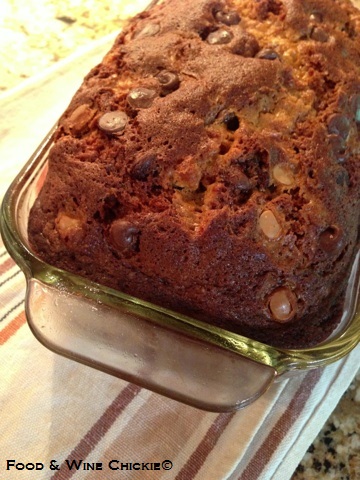
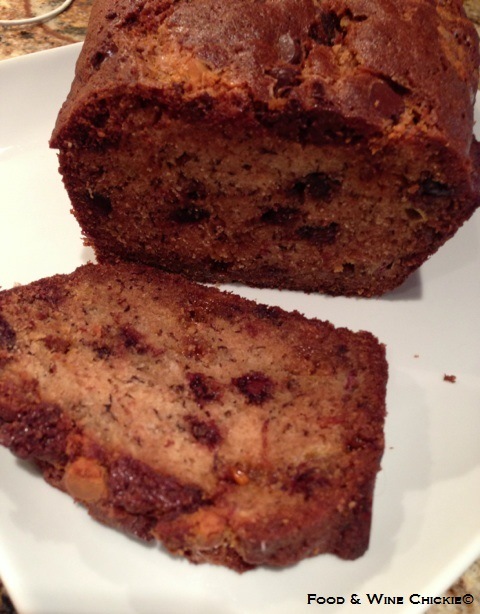
This banana bread is gilded with chocolate and butterscotch chips that give the plain version a major facelift. The resulting product is moist and chocolaty.

Ingredients:

  • ¾ cup butterscotch chips
  • ¾ cup miniature semisweet chocolate chips
  • 1 ¾ cups all-purpose flour
  • 1 ½ tsp. baking soda
  • ¾  tsp. Kosher salt
  • 3 large eggs, at room temperature and lightly beaten
  • ¾ cup firmly packed light brown sugar
  • 2/3 cup sugar
  • 3 overripe bananas, mashed
  • 2/3 cup vegetable oil
Banana Mixture

Banana Mixture

Directions:

  1. Preheat the oven to 350 degrees. Butter or coat a 9-by-5 loaf pan with nonstick spray.
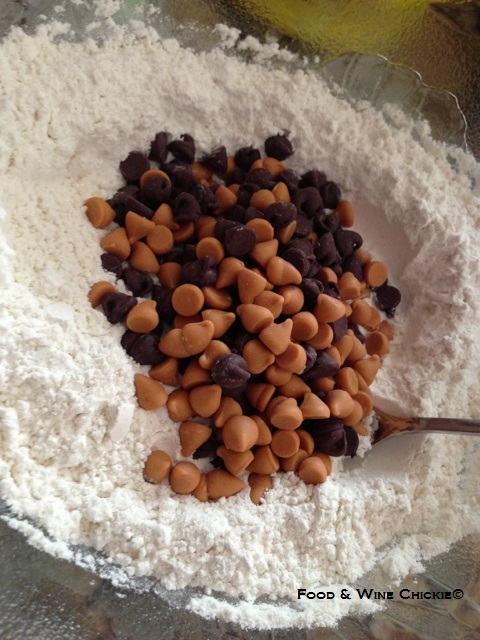
  2. Combine the butterscotch and chocolate chips in a small bowl. Set 3 tablespoons of the mixture aside for later use.
  3. Bread Batter

    Bread Batter

    Sift the flour, baking soda and salt in a medium bowl. Leaving the 3 tablespoon of chips out, add the remaining chips to the flour and toss to coat.

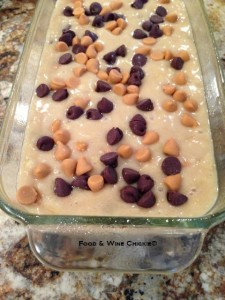
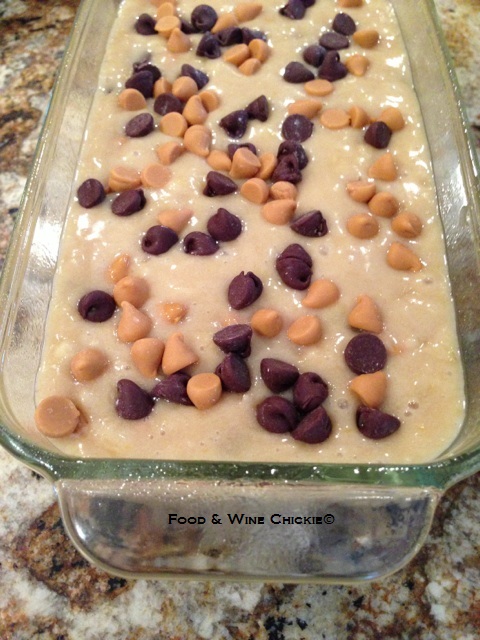
  4. Using a wooden spoon, combine the eggs, brown sugar, sugar, banana and oil in a larger bowl. Add the dry ingredients to the banana mixture and combine gently making sure to not over-mix. Pour the batter into the prepared pan. Sprinkle the remaining chips on the surface of the batter.
  5. Bake 60 minutes or just until a toothpick comes out mostly crumb-free when inserted in the center of the loaf. Cool on a rack for 30 minutes, then unmold and cool completely.

Sliced BreadNotes: Bread may be stored at room temperature up to 3 days wrapped airtight in plastic wrap. May be frozen, well-wrapped, up to 1 month. Defrost overnight in the refrigerator.

Servings: 8

Adapted from this The Daily Meal recipe.

Chocolate Chunk Cookies

Chocolate Chunk Cookies

Chocolate Chunk CookiesMy tasting panel (ten warehouse workers at my office) really liked these chewy yet crispy cookies and the extra chocolate from the addition of chunks with the chips.

This recipe yields 32 cookies which can be a lot of you’re only craving a quick dozen. The cookie dough can easily be divided and wrapped tightly in wax paper them aluminum foil and frozen for up to a month.

Ingredients:

  • 3 cups all-purpose flour
  • 1 ½ tsp. baking soda
  • 1 ½ tsp. salt
  • 2 sticks (1 cup) butter, softened
  • 1 ½ cup light brown sugar
  • 1 cup granulated sugar
  • 3 large eggs
  • 2 tsp. pure vanilla extract
  • 1 ½ cup semisweet chocolate chips
  • 1 ½ cup chocolate chunks

Directions:

  1. Preheat oven to 375 degrees.
  2. In a medium bowl, whisk the flour, baking soda and salt.
  3. In the bowl of an electric mixer fitted with a paddle attachment, cream the butter, brown sugar and granulated sugar on high speed until light and fluffy, about 2 minutes.
  4. Add the eggs to the butter mixture, beating well after each one, until fully combined, about 1 minute. Add the vanilla. With the mixer on low speed, add the flour mixture – do not over mix.  Add the chips and mix until just combined.
  5. Line four cookie sheets with parchment paper (if you only have two cookie sheets, break up the baking in two phases making sure the cookie sheets cool completely from the first batch prior to doing the next). For each cookie, scoop one tablespoon of dough, place on a cookie sheet and flatten gently with the palm of your hand. Eight cookies will fit on each cookie sheet.
  6. Bake, two sheets at a time, until golden, about 13 minutes. Allow the cookies to cool for 5 minutes on the cookie sheets then transfer cookies to a cooling rack to cool completely. Repeat the process with the last two cookie sheets.

Makes 32 cookies.

Annual Quebec Smoked Meat Pilgrimage

Annual Quebec Smoked Meat Pilgrimage

Cruditees

Cruditees

I just got back from making my summer trip up to Quebec and to my delight, my dad hosted us for his famous smoked meat sandwich party.

Smoked Meat Steaming

Smoked Meat Steaming

Steamed smoked meat sandwiches are a special Quebec treat.  Dad used his restaurant-grade food steamer to cook a 10-pound piece of corned beef for about 4 hours. The result was a perfectly moist and fork tender piece of meat. Rye bread was also steamed for a few minutes to create the perfect sandwich.

Smoked Meat Sandwich

Smoked Meat Sandwich

After its steam bath, the meat was sliced thin on an electric meat slicer and piled high on the rye bread. The only condiments the delicious sandwich needed was a little mustard and some crunchy pickles – yum!

Coleslaw

Coleslaw

My step-mom, Rolande, made her creamy, tangy coleslaw and served cold and crisp cruditees for all to enjoy. It was the perfect ending to a great family weekend.

Cheers,

Veronique

Easy Fried Raviolis

Fried Raviolis

Fried Raviolis

I don’t typically take shortcuts in the kitchen when I host a dinner party, but when it comes to fried raviolis, I see no issue with using store-bought, fresh raviolis. Seriously, even if I made fresh pasta with the best filling, would there really be a huge difference once I deep fried them? No.
This is an easy appetizer and a St Louis favorite.

Ingredients:

  • 9-ounce package fresh cheese raviolis (can be done with any stuffing in the raviolis)
  • 2 large eggs, beaten
  • 1 1/2 cups Italian bread crumbs
  • 1/2 cup Panko bread crumb
  • 1/2 cup freshly-grated Parmesan cheese
  • 2 cups Easy Marinara Sauce, for dipping

Directions:
Heat the oil in a heavy and deep pot until a candy / deep-fry thermometer reaches 375 degrees. The oil shouldn’t come up more than a third to a half of the depth of the pot at the risk of overflowing.
Dip the raviolis in the egg wash then coat in bread crumbs.
Fry the raviolis until they’re golden brown, about 3-4 minutes.
Remove the raviolis from the oil and place onto paper towels to drain for a minute.
Sprinkle the raviolis with Parmesan cheese and serve with Easy Marinara Sauce.

Easy Zeppole – Italian Fried Dough

Easy Zeppole – Italian Fried Dough

Photo by Eat with Dan

Photo by Eat with Dan

Who doesn’t love going to the fair and getting a hot paper bag full of Zeppole covered in confectioners’ sugar? Nobody – that’s who!

I’ve used a ‘standard’ recipe for fried dough that involved yeast and just the right warm water temperature but really, who needs to go through all that? This is one easy recipe that everyone can make. While the oil and frying can be scary, as long as you have a heavy pot deep enough, you’ll have no issues.

Ingredients:

  • ½ cup confectioners’ sugar
  • 2 quarts canola oil for frying
  • 1 cup all-purpose flour
  • 2 tsp. baking powder
  • 1 pinch Kosher salt
  • 1 ½ tsp. granulated sugar
  • 2 eggs, beaten
  • 1 cup whole milk ricotta cheese
  • ¼ tsp. pure vanilla extract
Photo by Eat with Dan

Photo by Eat with Dan

Directions:

  1. Add the confectioners’ sugar to a paper bag.
  2. Heat the oil in a heavy and deep pot until a candy / deep-fry thermometer reaches 375 degrees. The oil shouldn’t come up more than a third to a half of the depth of the pot at the risk of overflowing.
  3. In a medium saucepan, combine the flour, baking powder, salt and sugar. Stir in the beaten eggs, ricotta cheese and vanilla. Mix gently over low heat until combined, 1-2 minutes. Batter will be sticky.
  4. Drop the batter by tablespoons into the hot oil a few at a time to ensure your oil doesn’t cool off (raise the heat under the pot if temperature cools too much). Fry the Zeppole until golden brown, about 3 or 4 minutes. Add hot Zeppole to the paper bag and shake to cover in confectioners’ sugar. Serve warm.

Makes 3 dozen Zeppole.

Adapted from AllRecipe.

Duck Fat Fries

Duck Fat Fries

Duck Fat Fries

Duck Fat Fries

Last weekend, I hosted my First Annual FryFest. All foods served were…fried! Since I love fries cooked in duck fat, I decided to make those one of the various sides I served.

This is a classic double-fry process where the potatoes are first blanched in oil at a lower temperature to soften them then fried to a golden color and crisp exterior in hotter oil.

Fries Soaking

Fries Soaking

I made enough fries for an army at my party, but I scaled down the quantities to serve four people. Do yourself a favor and use Russet potatoes and don’t fool around with others that won’t give you the right taste and crispness. They’re easy to find and inexpensive.

Ingredients:

  • 4 large Russet potatoes, unpeeled but scrubbed
  • One 11.28-ounce container of duck fat (I used Rougie)
  • 5 cups peanut or canola oil
  • Sea salt
  • Freshly-grated Parmesan cheese (optional)

Directions:

  1. Cut the potatoes into 1/2” sticks.
  2. Rinse the potato sticks with cold water, add them to a large bowl filled with cold water and soak them for a few hours or overnight in the refrigerator. This will help rid the spuds of some of their starch and create ultra-crispy fries.
  3. Drain the potatoes very well and try to dry as much of the moisture as possible using a kitchen towel.
  4. Add the duck fat and the oil to a heavy pot (5-6 quarts). The fat/oil should only come up a third to a half of the way up the sides of the pot. If the oil goes higher than that, you risk the hot fat overflowing when you put the potatoes in so get another bigger pot.
  5. Heat the fat/oil to 325 degrees on a candy/deep fry thermometer. Add the potatoes and increase the heat to allow the fat/oil to stay at the 325 degree temperature. Fry for 5 minutes – fries should remain nearly white. Drain on several layers of paper towels and allow to cool.
  6. Bring the fat/oil to 375 degrees. Add the blanched fries and increase the heat to allow the fat/oil to stay at the 375 degree temperature. Fry for 7-8 minutes, until golden brown. Drain on several layers of paper towels, sprinkle with sea salt and Parmesan (if using) and serve at once.
Blanched Fries

Blanched Fries

Serves 4.

Notes: You can get through step 5 then wrap the blanched fries in aluminum foil and refrigerate until the next day. Once the fries are fully cooked, if you’re working in batches, you can keep them hot in a 200 degree oven for a few minutes – don’t leave them in for more than 15 minutes or the fries will get soggy.

First Annual FryFest

First Annual FryFest

Egg Roll Making

Egg Roll Making

Last night, I co-hosted the First Annual FryFest with my friend and fellow foodie, Danny of Eat with Dan. While not the picture of healthy eating, it was way fun evening filled with only foods that were fried.

Fried Raviolis

Fried Raviolis

The guests were treated to an egg roll wrapping demo by Dan and his beautiful bride, Melissa. The pair hand-rolled 50 egg rolls then fried them to perfection. They were by far the best egg rolls I’ve ever had and that was the consensus with the rest of the guests. What a treat!

The piece de resistance of the evening was a deep-fried turkey. The 14-pound bird was brined, coated with my Tangy Dry Spice Rub.  My guy built a pulley contraption to help lower and raise the turkey into the pot of hot oil safely. While I was concerned about things going badly with the whole turkey deep-frying, all went well because of good, smart planning.

Fried Turkey

Fried Turkey

Other items that graced our menu were onion rings in maple-flavored batter, fried Mozzarella, fried raviolis, corn dogs and duck fat fries. Dessert was fried ice cream and Zeppole – Italian fried dough.

Turkey Fryer Contraption

Turkey Fryer Contraption

I’ll share the recipes in upcoming posts so you can recreate them at your home.

The weather was fabulous, the guests were fun, the wine was rosé and the food was decadent and tasty. A fine combination for a great summer evening.

Have you liked Eat with Dan on Facebook? Have you followed him on Twitter? Do it now for drop-dead gorgeous food photos.

Cheers,

Veronique

Grilled Salmon Caprese Salad

Grilled Salmon Caprese Salad

Salmon Caprese SaladThis week, I posted a picture of a light lunch I’d made for myself and I received so many requests for the recipe that I thought I’d do a quick recap.

Seared Salmon

Seared Salmon

First of all, this isn’t really a “recipe”, it’s more of a tasty idea for a quick and easy summer salad. I like to grill a few salmon filets and used them in salads to help me have something of sustenance while on my silly low-carb diet. It’s also a great way to use up all those tomatoes in your gardens come late summer.

Ingredients:

  • 6-ounce salmon filet, skin on one side
  • 1 Tbsp vegetable oil
  • Big pinch of salt and pepper for the salmon
  • ¼ cup olive oil
  • 4 Tbsp. red wine vinegar
  • ½ Tbsp. Dijon mustard
  • ½ tsp. each salt, pepper and Oregano
  • 20 pear or cherry tomatoes, halved or 2 medium-sized tomatoes, cut into bite-size chuncks
  • 10 Bonconcini fresh Mozzarella balls halved or a couple slices of fresh Mozzarella, cubed


Grape Tomatoes

Grape Tomatoes

Directions:

  1. Coat the salmon with oil then rub the salt and pepper over it.
  2. Heat a medium skillet over medium-high heat and place the salmon, flesh-side down, in it. Cook without disturbing for 3 minutes. Carefully flip the fish with a thin spatula and cook skin-side down for 4 minutes. Set aside to cool for 15 minutes and refrigerate wrapped in foil for up to a day if not using right away.
  3. In a glass jar with a tight-fitted lid, add the ¼ cup of oil, the vinegar, the mustard and the remaining salt, pepper and the Oregano. Close the lid and shake vigorously. Alternatively, whisk all the ingredients in a small bowl. Refrigerate for up to 3 days if not using right away.
  4. In a serving bowl, add the tomatoes, cheese and the vinaigrette. Combine gently. Using your fingers, break off bite-size pieces of salmon into the bowl. Toss the salmon with the other ingredients gently. Serve at once.

Makes one serving.

5 National Cheesecake Day Recipes

5 National Cheesecake Day Recipes

Dulce de Leche Mini Cheesecake

Dulce de Leche Mini Cheesecake

Today’s National Cheesecake Day. I don’t care who decided today was dedicated to all things cheesecake – I love cheesecake!

Here are 5 cheesecake recipes to help you celebrate National Cheesecake Day!

What are some of your favorite cheesecakes?

Cheers,

Veronique

Easy Chicken Piccata

Easy Chicken Piccata

Chicken PiccataPiccata originated in Italy using veal. While I enjoy the veal version, I’m partial to chicken. This recipe is simple to make any night of the week and is fancy enough for a dinner party. I like to serve mine with a side of angel hair pasta.

Ingredients:

  • 2 skinless and boneless chicken breasts, butterflied and then cut in half to create 4 half breast portions
  • 1/2 tsp. each sea salt and freshly ground black pepper
  • 2 cups all purpose flour, for dredging
  • 6 Tbsp. butter
  • 5 Tbsp. extra-virgin olive oil
  • 1/3 cup fresh lemon juice
  • 1/2 cup chicken stock
  • 1/4 cup brined capers, rinsed
  • 1/3 cup fresh flat leaf parsley, chopped

Directions:

  1. Season chicken with salt and pepper. Dredge chicken in flour and shake off excess.
  2. In a large skillet over medium high heat, melt 2 tablespoons of butter with 3 tablespoons olive oil. When butter and oil start to sizzle, add 2 pieces of chicken and cook for 3 minutes. When chicken is browned, flip and cook other side for 3 minutes. Remove and transfer to a plate.
  3. Melt 2 more tablespoons butter and add another 2 tablespoons olive oil to the skillet. When butter and oil start to sizzle, add the other 2 pieces of chicken and brown both sides in same manner. Remove pan from heat (don’t clean) and add chicken to the plate.
  4. Reduce heat to medium and add the lemon juice, stock and capers to the skillet. Return to stove and bring to boil, scraping up brown bits from the pan for extra flavor. Check for seasoning. Return all the chicken to the pan and simmer for 5 minutes. Remove chicken to platter.
  5. Add remaining 2 tablespoons butter to sauce and whisk vigorously. Pour sauce over chicken and garnish with parsley.

4 Servings.