Easy Banana Bread

Easy Banana Bread

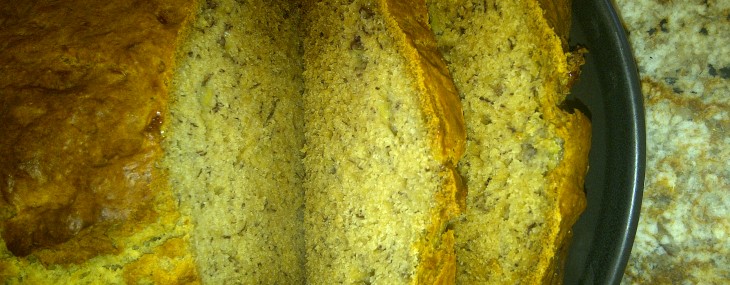
Not sure why, but the thought of throwing away over-ripe bananas drives me nuts.  Instead, I’ll spend a few bucks to save four $0.35 bananas – not logical, but makes for a treat everyone enjoys.

Ingredients

  • 2 cups all-purpose flour
  • 1/2 tsp sea salt
  • 1 tsp baking soda
  • 1/2 cup (1stick) unsalted butter, softened
  • 1 cup light brown sugar
  • 2 large eggs
  • 4 over-ripe bananas, mashed
  • 1/2 cup chopped walnuts (optional)

Directions

  1. Preheat oven to 350 degrees.
  2. Sift the flour, baking soda and salt in a large bowl – set aside.
  3. In the bowl of an electric mixer, cream the butter and brown sugar on medium speed for about 2 minutes.  Add the eggs, beating well after each one, add the bananas and beat for 1 minute.
  4. Pour the banana / butter mixture into flour mixture and stir with a wooden spoon until just combined – do not overmix.  Pour batter into a lightly grease 9×5 inch loaf pan and sprinkle walnuts over the top (if using walnuts).
  5. Bake for 60 minutes, or until a toothpick inserted into center of the loaf comes out with just a few moist crumbs.  Remove the banana bread from the oven and let  cool in pan for 15 minutes, then unmold and cool completely on a wire rack.

Notes: I like chunks of banana in my banana bread so I typically squeeze and knead the bananas while they’re still in the peel.  By the time I’m done with this fun task, all I need to do is remove the peels and add the ‘mashed’ bananas to the batter.

Feeling Sappy? My Top 5 Maple Syrup Desserts

Feeling Sappy? My Top 5 Maple Syrup Desserts

Maple Water Bucket

Maple season’s here and every year that I don’t make it home to Quebec for the sweetest season of all, I get a bit homesick. I grew up in a small town in southeast Quebec where my family and four other families of friends owned a sugar shack. I have very fond memories of harnessing horses to a sled hauling a maple sap collection barrel and then bring this sap to the shack for the boiling process that would result in amber elixir our moms then cooked and baked with.

This year, since I won’t be making the pilgrimage north, I decided to bake and cook with maple syrup for a two-week stretch to get my fix in. I even requested the help of my family to expand my maple recipe collection. Here are my top 5 maple dessert recipes from my archives and from newly-shared family recipes:

  1. Eggs in Maple Syrup
  2. Maple Delights
  3. Maple Syrup Dumplings
  4. Maple Syrup Pie
  5. Maple Taffee on the Snow

BONUS 6: Maple Whipped Cream

If you decide to try any of them, please leave a comment on this post so I can let my mom, aunt and grandma who contributed know that our traditional family recipes are being enjoyed.

Cheers!

Veronique

Eggs in Maple Syrup (Oeufs Dans le Sirop D’Erable)

Eggs in Maple Syrup (Oeufs Dans le Sirop D’Erable)

My mom, Diane, isn’t the sweet tooth in the family, her love of food is more savory, so I’m excited to be able to share a dessert she craves often and can’t live without – scrambled eggs cooked in maple syrup.  Yea, I know, it sounds odd, but it’s a very traditional dish in Quebec, especially during sugar shack season in the spring.  Think egg drop soup, but with maple syrup instead of broth.  Give it a try a let me (and my mom) know what you think!

Ingredients:

  • 1 cup maple syrup (see ‘notes’ below)
  • 2 large eggs
  • 1/4 tsp salt
  • Vanilla ice cream (optional, sort of)

Directions:

  1. Bring the syrup to a boil in a small, heavy saucepan, over medium-high heat.  Once the syrup has begun to boil, turn heat to medium-low.
  2. In a medium bowl, break the eggs, then scramble them well using either a fork or a whisk.  Add salt to the eggs and stir to incorporate.
  3. Pour the egg mixture into the simmering syrup and stir with a wooden spoon to incorporate the egg into the hot syrup.  Cook for 3-4 minutes, then remove the saucepan from the heat and let sit to cool for about 15 minutes.
  4. Scoop ice cream in two bowls, divide eggs between the two bowls then spoon some cooking liquid onto the eggs and ice cream.

Makes 2 servings.

Notes: Don’t waste top notch maple syrup to bake or cook with, less fancy grade will do just fine and often offers stronger maple flavors.  This recipe can easily be doubled.  Letting the mixture cool off a bit before serving allows the syrup to thicken slightly, so don’t omit this step, no matter how difficult it will be!

Pulled Pork Stuffed Poblano Peppers

Pulled Pork Stuffed Poblano Peppers

Stuffed Poblano Chiles

I love Mexican food and try to fix some type of Mexican dish at least once a month.  On a weekend where I was craving Chile Rellenos, I decided to tweak my recipe a bit and stuff the chiles with slow-cooked pork shoulder I fixed in my slow cooker – boy was it a winning dish and simple to make!

Ingredients:

  • 4 large Poblano peppers
  • 2 cups Troegs Braised Slow Cooker Pork Shoulder, shredded with two forks
  • 2 cups shredded Monterrey Jack cheese
  • 2 tbsp chopped cilantro
  • 2 large eggs
  • 1 cup cornmeal
  • 2 tbsp olive oil

Directions:

  1. Roast the Poblano peppers over a flame (or under the broiler) until the skin is almost completely blackened.  Place roasted peppers in a glass bowl and cover with shrink wrap for about 15 minutes.
  2. In a medium bowl, combine the pork, 1 cup of cheese and cilantro.
  3. Peel the skin off the peppers, cut a slit down the long side of the peppers then remove the seeds and most of the veins.
  4. Divide the stuffing into 4 portions, then stuff peppers with the pork mixture – do not overfill.  Secure the opening of each pepper with 1-2 toothpicks.
  5. In a shallow bowl, beat the eggs well.  In a separate shallow bowl, add the cornmeal.  Dip each stuffed pepper in the egg mixture then coat with cornmeal.  Place the coated peppers in an oven-proof dish.  Drizzle olive oil over the peppers, sprinkle with the remaining 1 cup cheese then place in the oven to bake for about 20-25 minutes.
  6. Serve each pepper over Spanish rice with a squeeze of fresh lime juice.

Makes 4 servings.

Troegs Braised Slow Cooker Pork Shoulder

Troegs Braised Slow Cooker Pork Shoulder

Ingredients:

  • 1 – 3lb pork shoulder (pork butt, Boston butt)
  • 3 tbs maple syrup
  • 2 tbs dry mustard
  • 1 tsp each – salt, pepper
  • 1/2 tsp each – cumin and chili powder
  • 1 medium onion, sliced
  • 3 carrots, chopped
  • 1 bottle Tröegs Hop Back Amber Ale, or another medium bodied beer

Instructions:

  1. Rinse pork shoulder with water and pat dry with paper towels.
  2. Drizzle the maple syrup over pork then rub all over surface.
  3. In a small bowl, combine dry mustard and all the spices.  Rub over the meat.
  4. Place the onion slices and carrot pieces in the bottom of a 5-quart slow cooker.  Place pork over the vegetables then pour beer around it.
  5. Cook on HIGH for 6-7 hours.
  6. Remove pork from slow cooker, discard the vegetables then tear the meat into chunks using two forks.  Serve.

4 Servings.

Notes: Serve pork as a pulled pork sandwich in a bun by combining the meat with some BBQ sauce, use in quesadillas, tacos or enchiladas, in Pulled Pork Stuffed Poblano Peppers or other dishes calling for braised meat.

Maple Delights (Délices à l’Erable)

Maple Delights (Délices à l’Erable)

My aunt, Francoise, from Quebec shared her simple recipe for simple maple treats that’s a breeze to prepare.

Ingredients:

  • 3/4 cup light brown sugar
  • 1/4 cup maple syrup (see ‘notes’ below)
  • 1 cup heavy whipping cream
  • 1 8-ounce can of Pillsbury crescent rolls

Directions:

  1. Heat oven to 375 degrees.
  2. In a 9-inch pie plate, combine the brown sugar, maple syrup and heavy cream using a fork to create a homogenous mixture.  Set aside.
  3. Take the crescent rolls out of the packaging, but do not unroll.  Using a sharp knife, cut the rolls into 8 slices of the same width.  Place all the dough slices on their sides on top of the maple cream mixture.
  4. Place the pie plate unto a cookie sheets (who wants to risk spillovers?) then into the oven and bake for 25-30 minutes, until the treats are golden brown.
  5. Remove the pie plate from the oven, and let the treats cool for about 15 minutes before serving with either Maple Whipped Cream or vanilla ice cream.

Makes 8 servings.

Notes: Don’t waste top notch maple syrup to bake or cook with, less fancy grade will do just fine and often offers stronger maple flavors.

Maple Whipped Cream (Crème Fouettée à l’Erable)

Maple Whipped Cream (Crème Fouettée à l’Erable)

The addition of maple syrup to whipped cream is a stroke of genius by my aunt, Francoise, who generously shared her recipe.

Ingredients:

  • 3/4 cup heavy whipping cream
  • 1/4 cup maple syrup (see ‘notes’ below)

Directions:

  1. In the bowl of an electric mixer, add the cream.  Start the mixer on low for 30 seconds, then increase the speed to high and mix until very soft peaks form, about 1 1/2 minutes.
  2. With the mixer running, add the maple syrup in a steady stream to the whipping cream until fully incorporated.  Mix until medium peaks form, an additional 2 minutes.  Serve.

Makes 6 dollop-size servings.

Notes: Don’t waste top notch maple syrup to bake or cook with, less fancy grade will do just fine and often offers stronger maple flavors.  For best results, chill the bowl of the electric mixer for 20 minutes in the freezer before making the whipped cream.

Pots de Crème au Chocolat Pour Deux

Pots de Crème au Chocolat Pour Deux

Lately, I’m on this quick to make desserts in ramekins.  Not sure why I’m in this frame of mind, but so far, it’s worked out pretty well for my guy and my friends.  Today, the mood is towards chocolate, so I decided to make Chocolate Pots de Crème.  What’s nice about this recipe is that it serves two people, so it can be made anytime, even when company’s not around.

Ingredients:

  • 2/3 cup heavy cream
  • 2/3 cup whole milk
    • 1 vanilla bean, split (could use 1 tsp pure vanilla extract)
    • 4 tbsp granulated sugar
    • 1/2 chocolate chips (milk or dark)
    • 4 egg yolks, lightly beaten

Directions:

  1. Preheat oven to 325 degrees.
  2. Warm the cream, milk, vanilla bean and sugar in a small sauce pan over medium heat until barely simmering, about 3 minutes.  Remove the vanilla bean, scrape its seeds then add them to the cream mixture. Discard the vanilla bean and stir the mixture well.
  3. Place the chocolate in a large heat-proof bowl.  Pour the hot cream mixture over the chocolate and stir until it’s melted.
  4. Slowly whisk the egg yolks into the chocolate and cream.  Make sure the ingredients are completely incorporated.
  5. Using a fine sieve, strain the mixture then pour into two 7-ounce ramekins.  Place the ramekins into a baking dish (I use a meatloaf pan) and pour hot water into the pan until it comes half way up the ramekins.  Be sure no hot water gets into the ramekins.
  6. Bake in the oven until the mixture sets, about 35 minutes.
  7. Transfer ramekins to a cookie sheet to cool for about 30 minutes.  Place a sheet of shrink wrap on the surface of each ramekin to prevent a skin from forming, then refrigerate, loosely covered with foil, until completely chilled, about an hour.
  8. Serve with a dollop of whipped cream or a dusting of powdered sugar..

Makes 2 servings.


Chef Bradley Ogden Butterscotch Pudding

Chef Bradley Ogden Butterscotch Pudding

Butterscotch Pudding

Was sent master chef Bradley Ogden‘s childhood recipe for butterscotch pudding that he serves at his restaurants and absolutely loved it.  I’m typically a chocolate girl, but this pudding, that I made some tweaks to, is simply fabulous.  Chef Ogden is known to enjoy the “skin” that forms on the surface of the pudding as it sets, so I opted to recreate the recipe this way – it was the best part of the dish, good call chef!

Ingredients:

  • 5 cups heavy cream, divided
  • 1 vanilla bean, split, with seeds scraped and reserved
  • 1 cup butterscotch chips
  • 5 egg yolks
  • 1/2 cup light brown sugar
  • 2 tbsp water
  • 2 tbsp Scotch
  • 1 tsp pure vanilla extract

Directions:

  1. Preheat oven to 325 degrees. Boil some water in a kettle or pot and reserve for later use.
  2. Put 3 1/2 cups heavy cream and the vanilla bean and its seeds in a large, heavy saucepan. Bring to a boil (watch this process as the cream can boil over quickly), take off heat and whisk in butterscotch chips until blended smoothly.
  3. Place egg yolks in a large bowl and whisk well. Slowly add hot cream mixture while whisking vigorously. Set aside.
  4. In a small, deep, heavy saucepan, combine brown sugar and water over high heat. When sugar dissolves and caramelizes, about 3 minutes, carefully add scotch and 1/2 cup cream. Continue cooking, stirring well, until mixture is smooth and slightly thick, about 3 minutes. Whisk this caramel mixture into butterscotch mixture.
  5. Strain mixture through a fine sieve. Divide among 6 (7-ounce) ramekins. Place ramekins in a large roasting pan. Place pan on oven rack, then carefully pour hot water into roasting pan, taking care not to splash into ramekins. Water should come halfway up the sides of ramekins.
  6. Carefully slide roasting pan into oven. Bake for 1 hour and 30 minutes until puddings are mostly set but still a wiggly. Transfer ramekins to a rack or cookie sheet to cool for about 30 minutes, then refrigerate, loosely covered with foil, overnight.
  7. In the bowl of an electric mixer, beat the remaining 1 cup of cream with the vanilla extract until barely-stiff whipped cream is created, about 3-4 minutes.  Serve puddings with a dollop of whipped cream.

Makes 6 servings.

Notes: For the Scotch, I used what I had at home, which was Chivas that my father brought to the house last year (he’ll want to choke me when I tell him ;).  After cooling completely, the surface of the pudding will have this hardened ‘shell’ that’s amazing to ‘break’ through. If you prefer to not have this ‘shell’, simply place a sheet of shrink wrap on the surface each pudding prior to refrigerating.

Adapted from a recipe by Chef Bradley Ogden.

Rick Bayless Gives Airport Food a Good Name

Rick Bayless Gives Airport Food a Good Name

I’ve been commuting to Chicago from New York for work for just over a year now.  Flying from a destination with significant weather issues to one with worse weather swings means that I spend tons of quality time at O’Hare and LaGuardia airports.  The highlight of being stuck at O’Hare because of bad  weather conditions on two of my last three trips, has been my visits to Tortas Frontera, a new Rick Bayless restaurant at Terminal 1 of Chicago O’Hare International Airport.

I flew into O’Hare on the first day Tortas Frontera opened (my arrival gate was actually directly across from it) and loved the buzz and frantic energy already at the restaurant at 8:45AM.  On my return trip home that week, I knew I had to try Rick’s fabulous food.

Tortas Frontera offers a breakfast and an all-day menu with items so incredible that it’s difficult to make a selection.  Call me food obsessed, but who wouldn’t love to wake up to a Breakfast Molletes (warm open-face sandwich) of “queso fresco, sweet butter, cajeta caramel, toasted pecans, Mexican cinnamon and sugar ($4.50)?

Tortas Frontera features a guacamole bar that serves what might be the best guacamole I’ve had.  I order the “Fully Dressed” version ($6.25) with is topped with bacon, toasted pepitas, sun-dried tomatoes, spicy roasted peppers and a mix of queso fresco/cotija.  Is it a bit pricey for the size of the portion and the setting it’s enjoyed in, perhaps.  Is it worth every buttery, chunky avocado morsel, heck yes.

On last night’s visit to Rick’s place, I opted for the Torta Pepito, a Mexican griddle-baked sandwich filled with beer-braised beef short ribs, pickled jalapenos, Chihuahua cheese, black beans, cilantro crema and arugula ($11).  The ingredients are top-notch, fresh and delectable.

The tortas are made to order, so allow for a few worthwhile minutes before having to rush to your gate if you’re going to try Tortas Frontera.  I’ve found that sitting at a very well stocked bar near the checkout line with a hand-shaken margarita ($8.50) makes the minutes go by pretty painlessly.

I’d never thought I’d look forward to a visit to O’Hare or that I’d ever consider making that busy airport my midwest layover of choice, but this new addition to the Rick Bayless foodie empire has proven me wrong. A must.