Maple Bourbon Pecan Pie

Maple Bourbon Pecan Pie

Maple Bourbon Pecan Pie

Maple Bourbon Pecan Pie

For my French speakers: RECETTE EN FRANCAIS.

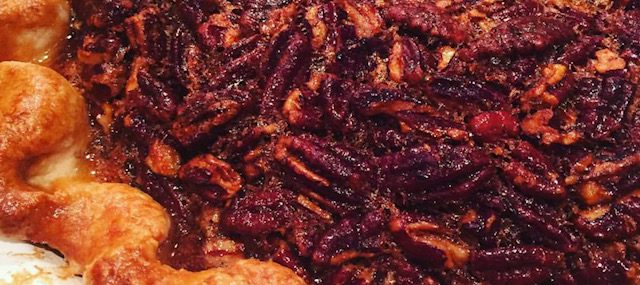
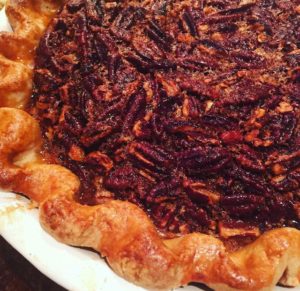
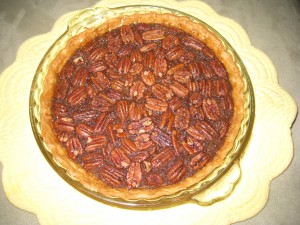
No need to look for a better pecan pie recipe, there isn’t one – this one’s the one folks!  Get used to accolades from your guests when you serve this nutty maple dessert at your next holiday gathering.  Even this photo of the unbaked pie looks yummy, doesn’t it?

I grew up with my grandma making pecan pie in Quebec and it was ultra sweet and delicious. My favorite part was the lightly caramelized pecans and the flaky, buttery crust. My sister left all the pecans and ate the jellied sugary filling. We’re weird like that!

You could use a store-bought crust for this, but it’s also simple to make your own using the recipe I like to in the ingredients list.

Ingredients

  • All-purpose flour, for dusting
  • Store-bought or homemade pie crust
  • 1 cup granulated sugar
  • 4 Tbsp. unsalted butter, melted
  • 4 large eggs
  • 1 cup plus 2 Tbsp. dark corn syrup
  • 1/2 cup pure maple syrup
  • 2 Tbsp. bourbon, or dark rum
  • 1 tsp. pure vanilla extract
  • 1 1/2 cups (5 1/4 ounces) pecan halves
  • 2 Tbsp. heavy cream
  • 1 large egg yolk

Maple Bourbon Pecan Pie

Directions

  1. On a lightly floured surface, roll dough to 1/8 inch thick. Transfer to a 9-inch tin, leaving a 1/2-inch overhang. Fold overhang under evenly. Chill for at least 30 minutes.
  2. Heat oven to 400 degrees.
  3. In a medium bowl, whisk together sugar, butter, 4 whole eggs, corn syrup, maple syrup, bourbon and vanilla. Fold in the pecan halves and pour filling into the crust. Chill for 30 minutes.
  4. Mix 2 tablespoons heavy cream with the egg yolk. Brush the egg glaze over the crust overhang, and transfer pie to the oven (I place the pie on a baking sheet in case of spills).
  5. Bake 15 minutes, and then reduce heat to 350 degrees. Bake until a knife tip comes out clean, about 1 hour 15 minutes. Serve warm or at room temperature.

Yields 8 servings.

(Adapted from Martha Stewart Living, November 1999).

Cauliflower au Gratin

Cauliflower au Gratin

Cauliflower au Gratin

My mother used to make this dish while I was growing up and it was always a special treat.  She’d serve cauliflower florets, and I’ve modernized the recipe a little to feature a whole head of cauliflower for a bit of ‘wow’.

Ingredients:

  • 1 tbsp kosher salt
  • 1 medium cauliflower head
  • 3 tbsp butter
  • 2 tbsp all-purpose flour
  • 1 cup whole milk
  • 1 cup light cream
  • 1/2 tsp each salt & pepper
  • 1/4 tsp grated nutmeg
  • 1/2 cup grated Gruyere or Emmental
  • 1/2 cup grated Mozzarella
  • 1/2 cup grated Parmesan

Directions:

  1. Preheat the oven to 400 degrees.
  2. In a deep pot of boiling water, add the salt then the cauliflower, core side down (top of the head up) and cook for 20-25 minutes, until tender but still a bit form.  Drain, then return to warm pot until ready to use.
  3. While the cauliflower is boiling, melt the butter in a medium saucepan over medium-low heat. Sprinkle the flour over the butter and stir for about 2 minutes, creating a light roux.
  4. Increase the heat to medium-high under the roux.  Add the milk and the cream and whisk the mixture until it boils, then cook for 2 minutes, until a thick sauce is created.  Add salt, pepper and nutmeg.
  5. In a medium bowl, combine the Gruyere/Emmental, the Mozzarella and the Parmesan.
  6. Add 1 ladleful of sauce on the bottom of a 2 quart baking dish.  Place the cauliflower on the sauce then pour the rest of the sauce over the cauliflower.
  7. Sprinkle the cheeses over the cauliflower then bake for 25 to 30 minutes, until the cheese is melted and browned.

6 Servings.

Note: You can easily replace the cauliflower with broccoli or do a combination of both vegetables.

Cream of Leek and Celery Soup

Cream of Leek and Celery Soup

Simple to prepare and tastes like a million bucks – this soup has it all.  Perfect first course on a cold winter night or when hosting guests who are vegetarians.

Ingredients:

  • 2 tbsp vegetable oil
  • 1/2 medium Spanish onion, finely chopped
  • 3 celery ribs, finely chopped
  • 3 leeks, white and light green parts chopped
  • 1 tsp dried oregano
  • 1/2 tsp each salt & pepper
  • 2 tbsp dry vermouth (optional)
  • 32 ounce container vegetable broth
  • 1 cup heavy cream

Directions:

  1. In a heavy saucepan, sauté the onion, celery and leek in the oil for 5 minutes over medium heat.
  2. Add oregano, salt and pepper and cook for 2 additional minutes – vegetables should be soft a lightly browned.
  3. Add the vermouth and the vegetable broth and simmer partially covered for 45 minutes over medium-low heat.
  4. Add the cream and warm for 2 minutes.
  5. Working in 2 batches, add the soup to a blender and puree until smooth, about 1 minute.  ***Be sure to remove the small venting cap from the blender to allow steam to come out and place a kitchen towel to cover the opening.  Return the pureed soup to a clean saucepan and gently heat for 2 minutes.
  6. To serve, ladle soup into bowls.

Serves 6 as a starter or 4 as a main course.

Note: Dress the soup with a light drizzle of heavy cream for an elegant touch.

There’s Nothing to Eat in This House Part 4

There’s Nothing to Eat in This House Part 4

Paprika and Tarragon Chicken and Egg Salad Mini Sandwiches

Mini Chicken & Egg Salad Sandwiches

It’s Friday, the day before my weekly trip to the grocery store, so here we go with the typical “There’s nothing to eat in this house” complaints from my guy.  As you’ll see from the picture of this dish, these small sandwiches could be great at a holiday party or for a luncheon.

Ingredients:

  • 1 chicken breast, either from leftovers or poached, then cut into bit-size pieces
  • Pinch of salt & pepper
  • ½ tsp dried tarragon
  • ½ tsp paprika
  • 1 celery rib, finely chopped
  • 1 tbsp finely chopped onion
  • 2 tbsp mayonnaise
  • 1 tbsp lightly toasted pine nuts
  • 2 hard-boiled eggs, cut into bite-sized pieces
  • 2 Pepperidge Farm Stone Baked Artisan Rolls, baked and sliced in halves horizontally

Directions:

  1. In a medium bowl, carefully combine the chicken, spices, celery, onion, mayo and pine nuts.  Gently fold in the egg ensuring not to over stir resulting in mushy egg.
  2. Scoop ½ of the mixture onto each roll.

Serves 2.

This is the 4th installment in the “There’s Nothing to Eat in this House” series (see part 1 here: http://bit.ly/dbucAf part 2 here: http://bit.ly/cJX6t2 and part 3 here: http://bit.ly/aTfRKI).

Cremini Mushroom Velouté Soup

Cremini Mushroom Velouté Soup

Cremini Mushroom Veloute Soup

This soup is super simple to make and looks like it took all day to prepare.  Dress the soup with a light drizzle of heavy cream for an elegant touch.

Ingredients:

  • 2 tbsp vegetable oil
  • 1/2 medium Spanish onion, finely chopped
  • 3 celery ribs, finely chopped
  • 1 pound cremini mushrooms, sliced
  • 1 tsp dried thyme
  • 1/2 tsp each salt & pepper
  • 2 tbsp dry sherry or Marsala
  • 16 ounce can of beef broth
  • 32 ounce can vegetable broth
  • 1/2 cup heavy cream + 6 tsp of heavy cream for garnish (optional)

Directions:

  1. In a heavy saucepan, sauté the onion and celery in the oil for 5 minutes over medium heat.
  2. Add the mushrooms to the vegetables and stir mixture.  Add thyme, salt and pepper and cook for 5 minutes until all the vegetables are softened.
  3. Add the sherry or Marsala, the beef and vegetable broth and simmer for 45 minutes.
  4. Add the 1/2 cup cream and heat up for 2 minutes.
  5. Working in 2 batches, add the soup to a blender and puree until smooth, about 1 minute.  ***Be sure to remove the small venting cap from the blender to allow steam to come out and place a kitchen towel to cover the opening.   Return the pureed soup to a clean saucepan and gently heat for 2 minutes.
  6. To serve, warm 6 tsp cream in a small bowl in the microwave for 30 seconds.  Ladle soup into bowls then drizzle 1 tsp warmed cream onto the soup in each bowl (optional).

Serves 6 as a starter or 4 as a main course.

Note: Can’t find cremini?  Replace with chopped portabella or white mushrooms.  For extra richness, add 3-4 veal neck bones to the onion and celery when sauteeing.

There’s Nothing to Eat in this House Part 3

There’s Nothing to Eat in this House Part 3

Linguini with Blue Cheese Sauce

Linguini with Blue Cheese Sauce

Linguini with Gorgonzola and Pine Nuts

You got it: it’s Friday, the day before my weekly trip to the grocery store, so here we go with the typical “There’s nothing to eat in this house” complaints from my guy.  As you’ll see from the picture of this dish, I wasn’t quick enough with the camera and my starving Marvin ate 75% of the dish prior to picture time.  Guess the leftover ingredients and pantry finds did the trick!

Ingredients:

  • 4 tbsp olive oil
  • 1/2 tsp red pepper flakes
  • 1/2 tsp dried sweet basil
  • Salt & black pepper
  • 1/2 cup milk
  • 2 ounces gorgonzola cheese (or other creamy blue cheese), chopped into small pieces
  • 1 cup linguini, cooked
  • 2 tbsp grated Parmesan cheese
  • 1tsp toasted pine nuts (add pine nuts to a small frying pan and toast over medium-high heat for 2 minutes, shaking the pan to avoid scorching)

Directions:

  1. Heat olive oil in a sauté pan over medium heat for about 20 seconds then add the pepper flakes, basil and salt and black pepper and cook for 30 seconds.
  2. Add the milk and cheese pieces and cook for 3 minutes stirring constantly until a smooth sauce is created.
  3. Toss the cooked linguini into the hot sauce, gently stirring to warm the pasta, about 2 minutes.
  4. Serve pasta with grated Parmesan and toasted pine nuts.

Serves 1.

This is the 3rd installment in the “There’s Nothing to Eat in this House” series (see part 1 here: http://bit.ly/dbucAf and part 2 here: http://bit.ly/cJX6t2).

Chorizo and Manchego Bites – Perfect Little Tapas Item

Chorizo and Manchego Bites – Perfect Little Tapas Item

Chorizo & Manchego Bites

Chorizo & Manchego Bites

Do you ever host hors-d’oeuvres parties and run out of ideas on what to make?  I love the idea of tapas for a home party and often struggle to make tasty bites while also having the freedom to prepare some of the dishes ahead of time.  The Chorizo and Manchego Bites fulfill the easy and tasty requirements and take so little work to prepare.

Ingredients:

  • 4-5 fresh Chorizo sausages (could use other fresh sausages with a bit of heat to them)
  • 1/2 pound – 1 pound Manchego cheese, cut into bite-size cubes

Directions:

  1. Heat your grill to medium-high heat and grill Chorizo sausages for about 6-7 minutes until the exterior of the sausages show some charred bits.  Let rest for 2-3 minutes then cut each sausage into 5-7 bite-size pieces.
  2. While the sausage is grilling, thread about 25 cheese cubes onto toothpicks.  Ensure to push the cheese towards the end of the toothpick where guests hold them to allow room for the Chorizo pieces.
  3. Thread a piece of Chorizo onto the toothpicks, touching the cheese, to allow the cheese to slightly melt from the heat of the hot sausage.  Serve!

Makes approximately 25 perfect bites.

Notes: You can easily double or triple the number of sausages and cheese cubes to allow for a larger group of people.  You could thread the cheese cubes ahead of time and keep refrigerated until party time.  You could also grill the sausages ahead of time, slice them and keep them warm in a foil-covered pan in a 200 degree oven for up to an hour before serving.

Slow Cooker Beef Short Ribs for the Non-Cook

Slow Cooker Beef Short Ribs for the Non-Cook

Beef Short Ribs

Beef Short Ribs

This comforting dish is one that even self-proclaimed non-cooks can whip up for company.   The tender beef with its rich sauce are best served over mashed potatoes.

Ingredients:

  • 1 large Spanish onion, sliced into medium rings
  • 4lb boneless beef short ribs
  • 1 pound button or cremini mushrooms, sliced
  • 1 tsp each – salt, pepper
  • 1/2 tsp each – onion powder, garlic powder, ground thyme
  • 2 bay leaves
  • 1 cup red wine, preferably Cabernet Sauvignon
  • 1 14-ounce can low sodium beef broth
  • 2 tbsp Worcestershire sauce
  • 1 tbs flour
  • 1 tbs butter, softened

Instructions:

  1. Place the onion rings in an even layer in a 7-quart slow cooker (crock pot).
  2. Place short ribs over the onions, ideally in a single layer.
  3. Add the mushrooms to the slow cooker, over the beef.
  4. In a small bowl, combine the salt and pepper and all the spices.  Sprinkle over the meat.
  5. Pour the wine, broth and Worcestershire sauce around the beef.
  6. Cook on LOW for 9-10 hours, then carefully remove the beef from slow cooker onto a platter.
  7. Turn the slow cooker to HIGH and bring cooking liquid to a simmer.  Using a ladle, remove the oily layer of fat from the cooking liquid and discard.
  8. Combine softened butter and flour to form a paste in a small bowl.  Add to liquid in the slow cooker and whisk to form a slightly thickened sauce, about 5 minutes.  Return the beef to the slow cooker to warm up, then serve making sure to discard of the bay leaves.

6 Servings.

Notes: For maximum flavor, sprinkle 1/2 cup all-purpose flour over the uncooked beef then brown the beef in batches in vegetable oil in a sauté pan prior to adding to the slow cooker.  For an interesting twist, add a cup of baby carrots over the onions before cooking.

There’s Nothing to Eat in this House – Maple Sugar Candy

There’s Nothing to Eat in this House – Maple Sugar Candy

Maple Sugar Candy

Maple Sugar Candy

This ‘recipe’ goes into my ‘There’s Nothing to Eat in this House’ sweet treats archive since my guy was in the mood for a sweet treat last night and I didn’t have some of the ingredients required for proper baking on hand.  Don’t shy away from trying this candy if you don’t have a cookie cutter to use as most of the time, when I make it, the softened candy doesn’t make it out of the saucepan!

Ingredient:

  • 1/2 cup maple syrup

Directions:

  1. Pour syrup into a small saucepan over high heat.  Bring to a boil and cook until the syrup forms small bubbles and appears foamy, about 4 minutes.
  2. Remove from the heat and let cool for 2 minutes over a trivet or potholder.  Using a wooden spoon, stir constantly until the syrup thickens to a pale tan, but spreadable consistency (think Nutella consistency) – about 15 minutes.  Don’t stir past this consistency or you’ll not be able to mold the candy (which is okay if you’re not trying to make the candy look cute – what I do 90% of the time).
  3. Coat any medium-sized cookie cutter with cooking spray, then spoon the maple mixture into it.  Use spoon and fingertips to get the mixture completely into the mold, then smooth the top.
  4. Let cool for 30 minutes and unmold.  Enjoy by breaking small pieces.

Makes one candy.

Notes:  I know that when you’re stirring the syrup, before it begins to cool, it seems like the mixture will never turn to the buttery, creamy mixture from the photos, but it absolutely will.  If you cook the syrup too long for the type of saucepan you have, the mixture will harden quickly and you’ll have to enjoy the candy by breaking into small bites – which is completely okay!

Biscuits Frigidaire (Icebox Cookies)

Biscuits Frigidaire (Icebox Cookies)

Growing up, my mom made the most succulent food one could ever want, but she wasn’t a baker.  In her short baked goods repertoire, is what we French Canadians call “Biscuits Frigidaire”.  Each time I make these icebox cookies, it brings back memories of getting the wax paper-wrapped cookie dough log out of the freezer so we could enjoy fresh baked treats within minutes.  This is truly one of the easiest cookie recipes, but one that yields crisps-chewy golden cookies on a moment’s notice.  Perfect for when unexpected guests stop by for coffee and you need a quick treat to serve.

Icebox Cookies

Icebox Cookies

Ingredients:

  • 1 cup (2 sticks) butter, softened
  • 1/2 cup light brown sugar
  • 1/2 cup granulated sugar
  • 1 egg, lightly beaten
  • 1 tsp pure vanilla extract
  • 2 cups all-purpose flour
  • 1/2 tsp baking soda
  • 1/4 tsp salt

Cookie Dough Directions:

  1. In the bowl of an electric mixer, cream the butter and the two sugars until light and fluffy – 4 minutes.
  2. Add the egg and the vanilla extract and beat to incorporate.
  3. In a medium bowl, sift the flour, the baking soda and the salt.
  4. Add the flour mixture to the butter-sugar mixture in half cup additions, beating to just incorporate between additions, then finally beat until dough begins to come together – no more than 2 minutes total.
  5. Divide the dough in half and place each half on a large sheet of wax paper (dough should be at the top of the sheet – think top of a sheet of paper).  Shape the dough into a log using the wax paper to help smooth the dough (think sushi roll), then wrap each dough log completely with the wax paper and twist each end to seal the logs.  Place logs in the refrigerator for several hours and up to three days (logs can be frozen for up to a month).

Baking Directions:

  1. Preheat oven to 400 degrees.  Line two cookie sheets with parchment paper or lightly spray with cooking spray.
  2. Cut the logs into 1/4 inch thick slices using a sharp, thin-blade knife.  Place the cookies on the cookie sheets approximately two inches apart.
  3. Bake 10-11 minutes or until lightly golden brown. Remove from oven and cool completely on a wire rack (waiting for the cookies to cool completely will be extremely difficult).

Makes about three dozen cookies.

Notes:  Cooled, baked cookies can be stored in an air-tight container at room temperature for a week (you’ll never have these cookies on hand for a week – trust me).  Thaw frozen cookie dough in the refrigerator before slicing.  Want to vary the recipe a bit?  Add mini chocolate chips to one of the dough logs!