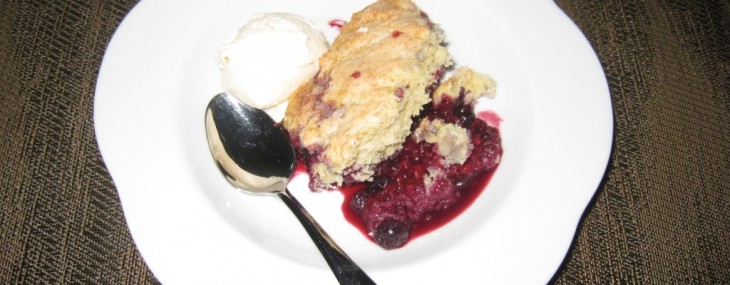
Very Berry Cobbler

Very Berry Cobbler

Berry Cobbler

Berry Cobbler

This is one easy and delicious dessert that anyone can make at the last minute using frozen mixed berries.  Obviously, don’t skip the vanilla bean ice cream.

Filling Ingredients:

  • 1 pint (2 1/2 cups) mixed berries (blackberries, blueberries and raspberries are ideal)
  • 1/3 cup sugar
  • 1 tbs lemon juice
  • 1 tbs cornstarch

Crust Ingredients:

  • 1 cup flour
  • 1/4 cup sugar
  • 2 tsp baking powder
  • 1/2 tsp salt
  • 3 tbs cold butter, cut into small pieces
  • 1/2 cup milk
  • 1 large egg
  • 1/2 tsp ground cinnamon

Directions:

  1. Preheat oven to 375F.  Coat 1-quart baking dish with cooking spray or softened butter.
  2. Combine berries, 1/3 cup sugar, lemon juice and cornstarch in a small bowl.  Spoon into the prepared dish.
  3. Stir together the flour, 2 tbs sugar, baking powder and salt in a medium bowl.  Cut in the butter with a pastry cutter, or two knives, until mixture resembles coarse meal.
  4. Whisk together milk and egg.  Stir egg mixture into the flour mixture until just blended – do not overmix.
  5. Drop batter by tablespoonfuls over the berry mixture.
  6. Mix cinnamon and remaining 2 tbs sugar in a small bowl.  Sprinkle sugar mixture over the batter.
  7. Bake for 40 minutes.

Makes 6 servings.

Beef Tenderloin Stroganoff

Beef Tenderloin Stroganoff

Beef Stroganoff

Beef Stroganoff

Both my mother and my sister make delicious versions of beef stroganoff and I often use their recipes, but this one is a bit luxurious with the use of beef tenderloin and bourbon.  I typically make this recipe when I buy a whole tenderloin as I use the end pieces and uneven bits I get while trimming.

Ingredients:

  • 2 tbs olive oil
  • 2 pounds beef tenderloin, cut into 3″ long and “1 inch wide strips and patted dry
  • 1/2 tsp each, salt & pepper
  • 2 tbs butter
  • 1/2 medium onion, chopped finely
  • 1 pound cremini or small white mushrooms, chopped roughly
  • 1 cup beef broth
  • 2 tbs bourbon
  • 1  cup sour cream
  • 2 tbs Dijon mustard
  • 1 tbs flat leaf parsley, chopped
  • Cooked white rice or wide egg noodles

Directions:

  1. Add olive oil to a large skillet over high heat until nearly smoking.  Season meat with salt and pepper, then add to hot skillet and brown on all sides, about 2 minutes.  Place meat into a shallow baking dish for later use.
  2. Melt butter in the skillet used for the meat over medium-high heat.  Add onions and cook until softened and slightly golden, about 4 minutes.
  3. Add mushrooms and sauté for about 10 minutes.
  4. Add broth and bourbon and cook down until liquid is almost completely evaporated, about 15 minutes.
  5. Incorporate the sour cream and mustard, combining well, then add the reserved meat and any juices from the baking pan. Continue cooking on medium-low heat for about 5 minutes.  Add parsley and re-season with salt and pepper if needed.
  6. Serve over white rice or egg noodles.

Serves 4.

Notes:  I typically serve this dish over egg noodles, but my guy loves it over white rice.  Nice alternative.  I also like to add an additional dollop of sour cream to top off the dish at serving time.

Potato Gnocchi with Pork and Wild Mushroom Ragu

Bon Appetit recipe from the February 2010 issue: http://bit.ly/atNkKQ

INGREDIENTS

  • 1 ounce dried porcini mushrooms
  • 1 1/2 cups boiling water
  • 3 tablespoons olive oil, divided
  • 8 ounces sliced crimini (baby bella) mushrooms (I used a 10-ounce package)
  • 2 garlic cloves, minced (I used 3 cloves)
  • Coarse kosher salt
  • 2 1/2 cups dry white wine, divided (I used a Pinot Grigio)
  • 1 pound boneless country-style pork ribs, cut into 1/2-inch cubes
  • 2 ounces 1/4-inch-thick slices coppa or prosciutto, chopped (I used center-cut bacon)
  • 6 ounces fresh mild Italian sausages, casings removed (about 2 links)
  • 1 medium onion, finely chopped
  • 1 carrot, peeled, finely chopped
  • 1 celery stalk, finely chopped
  • 2 cups crushed tomatoes or crushed tomatoes with added puree (from one 28-ounce can; preferably San Marzano or Muir Glen)
  • 1 cup (or more) low-salt chicken broth
  • 2 bay leaves
  • 1 tablespoon chopped fresh basil
  • Potato Gnocchi (see recipe)
  • 1 cup grated Parmesan cheese

PREPARATION

  • Place dried porcini mushrooms in medium bowl; pour 1 1/2 cups boiling water over. Let stand until mushrooms are soft, about 45 minutes. Using slotted spoon, transfer mushrooms to cutting board and chop coarsely. Reserve soaking liquid.
  • Meanwhile, heat 1 tablespoon oil in heavy large skillet over medium-high heat. Add crimini mushrooms and garlic; sprinkle with coarse salt and pepper and sauté until beginning to soften, 2 to 3 minutes. Add 1/2 cup wine and simmer until crimini mushrooms are soft, about 4 minutes. Set aside (there may still be liquid in skillet).
  • Heat remaining 2 tablespoons oil in heavy large pot over medium-high heat. Sprinkle pork with coarse salt and pepper. Add pork to pot and sauté until browned in spots, about 6 minutes. Using slotted spoon, transfer pork to medium bowl. Pour off all but 1 tablespoon fat from pot. Reduce heat to medium. Add coppa and stir 1 minute. Add sausages and cook until brown, breaking up into small pieces with back of spoon, about 3 minutes. Add onion, carrot, and celery. Cover pot and cook vegetables until soft, stirring occasionally, about 8 minutes. Add remaining 2 cups wine; bring to boil, scraping up any browned bits. Simmer until almost all liquid is absorbed. Add tomatoes, 1 cup broth, bay leaves, reserved pork, and porcini mushrooms. Pour in reserved porcini soaking liquid, leaving any sediment behind in bowl. Bring to boil; reduce heat to medium-low and simmer uncovered until pork is tender, adding more broth by 1/4 cupfuls if dry, about 1 hour.
  • Stir crimini mushroom mixture in skillet into ragu. Season with salt and pepper.
  • Spoon off fat from surface of ragu; stir in basil. Add Potato Gnocchi; toss gently to coat. Simmer over medium heat until gnocchi are heated through, 3 to 5 minutes.
  • Divide gnocchi and ragu among bowls. Sprinkle with some of cheese and serve, passing remaining cheese alongside.

6 TO 8 SERVINGS

Notes:  Ragu can be made 1 day ahead. Cool slightly. Chill uncovered until cool. Cover; keep chilled. Rewarm before continuing. (Was even better the next day, if that’s possible).

Potato Gnocchi

Potato Gnocchi

Bon Appetit recipe from the February 2010 issue: http://bit.ly/9Om4pL

INGREDIENTS

  • 1 1/2 pounds russet potatoes, scrubbed
  • 1 cup (or more) all purpose flour
  • 1 large egg yolk, beaten to blend
  • 1 teaspoon coarse kosher salt
  • Large pinch of freshly grated nutmeg
  • 1 tablespoon olive oil

SPECIAL EQUIPMENT

  • Potato ricer or food mill

PREPARATION

  • Preheat oven to 400°F. Pierce potatoes in several places and bake until soft, about 1 hour. Cool slightly. Cut potatoes in half. Working in batches, scoop hot flesh into potato ricer or food mill. Rice potatoes onto rimmed baking sheet; spread out and cool to room temperature.
  • Line large baking sheet with parchment paper. Transfer potatoes to large bowl.
  • Add 1 cup flour; toss to coat. Form well in center of potato mixture. Add egg yolk, coarse salt, and nutmeg; stir with fork until mixture is evenly moistened (mixture will look shaggy). Turn mixture out onto lightly floured work surface. Knead until dough comes together, sprinkling dough with flour very lightly only if dough is very sticky. Form dough into ball; divide into 4 pieces. Roll each piece between hands and work surface into 3/4-inch-thick rope. Cut each rope into 3/4-inch pieces. Place gnocchi on prepared baking sheet.
  • Working in batches, cook gnocchi in large pot of boiling salted water until gnocchi rise to surface of water. Continue to simmer gnocchi until cooked through and tender, stirring occasionally, about 4 minutes. Using slotted spoon, carefully transfer gnocchi to bowl. Drizzle gnocchi with olive oil and toss to coat.

Serves 6-8.

Notes: Gnocchi can be made up to 2 days ahead. Cover and refrigerate.

There’s Nothing to Eat in this House Part 2

There’s Nothing to Eat in this House Part 2

Anchovy & Tomato Pasta

Anchovy & Tomato Pasta

This is the 2nd installment in the “There’s Nothing to Eat in this House” series (see part 1 here: http://bit.ly/dbucAf).

As typical for me, Friday is the day before my weekly trip to the grocery store, so the fresh food on hand is limited.  Here’s a quick and VERY tasty dish I whipped up using basic ingredients from the pantry and from leftovers.  I had leftover fresh bruschetta “salsa” in the fridge, so I added it, but chopped tomatoes with 1 clove of chopped garlic and some basil will also work:

Ingredients:

  • Thin spaghetti, 1 portion
  • 3 strips of lean bacon
  • 1/4 cup olive oil
  • 1/2 tsp red pepper flakes
  • Salt & black pepper
  • 1 anchovy filet, from a oil-packed jar
  • 1/2 cup fresh bruschetta salsa
  • Shaved Parmesan

Directions:

  1. Cook a portion of thin spaghetti according to package directions, drain
  2. Place 3 bacon strips on a double layer of paper towel then top the bacon with 1 sheet of paper towel.  Microwave for 2 minutes.  Remove from the microwave, let cool and then break into small chips.
  3. Heat olive oil in a sauté pan over high heat until nearly smoking, about 20 seconds
  4. Add the anchovy filet and break up with a wooden spoon, then add the pepper flakes, salt and black pepper and cook for 30 seconds
  5. Turn the heat down to medium, then add the cooked bacon and the tomato mixture and sauté for 3 minutes
  6. Toss the pasta into the mixture, coating well
  7. Serve pasta with shaved parmesan and a sprinkling of black pepper

Serves 1.

Notes:  Don’t panic about the anchovy filet.  You won’t be able to taste it in the final dish, but it adds an interesting flavor.  I always keep a small jar of anchovies in oil in the fridge for dishes like this one.

Stay tuned for more quick dishes from the pantry!

Slow Cooker Overnight Oatmeal

Oatmeal Serving

Oatmeal Serving

Oatmeal on a cold morning is a personal favorite.  I’ve seen a ton of recipes for Crockpot oatmeal and finally decided to try it.  I’ve tried my own version and it’s worked well on the first try!  The steel-cut oats give the oatmeal fabulous texture and the old-fashioned oats provide the creaminess that’s perfectly soothing on a cold morning.  Make in the evening and wake up to a perfect breakfast.

Ingredients:

Directions:

  1. Oatmeal Cooking

    Oatmeal Cooking

    Find a ovenproof bowl that will fit inside your Crockpot with some space around it.  Fill the Crockpot with water to half full.  Place the empty bowl in the Crockpot.

  2. Blend the water, oats and salt in the bowl.
  3. Turn the Crockpot on low and cook for 8 hours.
  4. Serve with maple syrup, raisins and cream if desired.

Makes 4 servings.

Notes: Yes, the oatmeal can be made by incorporating dried fruit like dates, apricot and cranberries in the cooking process, but the above is the purist’s version.

Maple Taffee on Snow (Tire sur la Neige)

Maple Taffee on Snow 2

Maple Taffee on Snow 2

As my family began getting ready for the food frenzy my visit to Quebec would bring on, one thing that my oldest niece, Maude, wanted to be sure my sister would fix for us is Tire sur la Neige, or Maple Taffee on Snow.  This treat is one most popular at sugar shacks during maple syrup season, but great anytime there’s snow outside.

Ingredients:

  • 2 – 3 cups maple syrup
  • Freshly gathered snow packed tightly into a wide, low container

Directions:

  1. Maple Taffee on Snow

    Maple Taffee on Snow

    Pour the maple syrup into a medium saucepan and bring to a boil on high heat.  Reduce heat to medium and simmer until it reaches 240°F on a candy thermometer, approximately 4-5 minutes.

  2. Using a ladle,  drizzle some of the hot syrup onto the snow, making certain not to cover the entire surface (you can re-pour additional syrup after the first round of taffee is gone).
  3. Let the taffee set for a minute then pick up by rolling on a fork or wooden chopstick.

Notes:  Don’t have snow where you live?  Finely-crushed ice from a blender would work!

Grandma's Chocolate and Peanut Butter Treats

Chocolate and Peanut Butter Treats

Chocolate and Peanut Butter Treats

These treats come straight from my childhood as my Grandma made them for the holidays as far back as I can remember.  She’d make a double batch and freeze the finished treats so we’d have them well into the new year.

Ingredients:

  • 1/3 cup grated paraffin wax
  • 8 ounces milk chocolate chips
  • 1 cup smooth peanut butter
  • 2 cups powdered sugar, sifted
  • 2 cups puffed rice cereal

Directions:

  1. Melt paraffin and chocolate in a glass or metal bowl placed over a pot of simmering water over medium-low heat.  Don’t allow the bowl to touch the simmering water.
  2. Add peanut butter to the melted chocolate and blend well until fully incorporated.
  3. Stir the powdered sugar into the mixture.  Remove from heat and add the puffed rice cereal, making certain that the cereal is fully coated with the chocolate mixture.
  4. Drop spoonful of the mixture on a wax paper-lined cookie sheet and cool.  Refrigerate cooled treats.

Makes approximately 24 treats.

Notes: Paraffin wax can be found at most grocery stores in the canning section where Mason Jars are found.  Only use consumable wax such as Gulf Paraffin Wax.  Grate the paraffin using a box grater or microplane.

Cherry Blossom Treats

I’m Canadian and one of the candy bars I loved as a kid was the Cherry Blossom.  This treat features a thick chocolate, peanut butter and coconut shell with a tasty cherry syrup and maraschino cherry center.  The Cherry Blossom is a treat I always look forward to having when I go visit my folks in Quebec, and my mother shared the recipe we’d made when I was a kid.

Cherry Blossom

Cherry Blossom

For the chocolate treat:

  • 1 cup semi-sweet chocolate chips
  • 1/4 cup grated paraffin wax
  • 1 cup confectioner sugar
  • 1/2 cup crunchy peanut butter
  • 1/3 cup grated coconut
  • 12 whole, red maraschino cherries

Chocolate treat directions:

Combine all the chocolate treat ingredients in a microwaveable dish and microwave in 1 minute increments, stirring after each minute, until the mixture is nearly completely melted, 2-4 minutes.  Stir mixture thoroughly to ensure any un-melted bits are completely melted.

Cherry syrup:

  • 1/2 cup cherry liquid from a red maraschino cherry jar
  • 1 cup confectioner sugar

Cherry syrup directions:

In a small bowl, combine the liquid and the confectioner sugar, stirring until a thick syrup is created.

Assembly directions:

  1. Wash and dry a Styrofoam egg container, cut off the lid with scissors then oil each egg compartment well.
  2. Take melted chocolate mixture and cover each egg compartment with a thick coating using a spoon.  Work fast as the mixture will harden quickly.  If the mixture gets too hard, microwave it for 30 seconds.
  3. Add a cherry and about 1 tablespoon of cherry syrup to each egg compartment, then use additional chocolate to create a ‘lid’ for each treat.  Ensure the chocolate ‘lids’ seal in the syrup completely to avoid leaks.  Cover the egg container with cling wrap.
  4. Refrigerate overnight or at least 12 hours.  Unmold each treat carefully, then wrap each treat with aluminum foil.  Keep refrigerated.

Yields 12 treats.

Notes: You could use a cardboard egg container, but you’d need to line it with cling wrap that you’d then oil thoroughly.  Paraffin wax can be found at most grocery stores in the canning section where Mason Jars are found.  Only use consumable wax such as Gulf Paraffin Wax.  Instead of using oil on the egg container, you could also use cooking spray.

Koulourakia – Greek Cookies

Koulourakia

Koulourakia

I dated a Greek guy for three years when I was younger and absolutely loved the holidays at his parents’ home.  Tons of cooking and baking and I learned a lot about simple, tasty food from his mother and Yia Yia (his Grand-Mother).  Every Easter, his Yia Yia would come to the house and bake her Koulourakia cookies.  She didn’t have a recipe, just memories from the old country but was willing to let me write down the ingredients and her techniques for the enjoyment of the next generation.  I’ve come up with the measurements in the following recipe as I didn’t think many people would appreciate the “put enough flour so that the dough will be okay”.  These cookies are dry and almost tasteless, but are addictive and you’ll want a dozen at-a-time.  Here’s to Theodora!

Ingredients:

  • 2 sticks butter
  • 3 large eggs
  • 1 cup sugar
  • 1 tsp baking powder
  • 1 ounce of whiskey mixed with a pinch of baking soda
  • 1 tsp vanilla
  • flour (approximately 3 1/2 cups)
  • 1 large egg beaten with ¼ cup milk
  • sesame seeds (approximately 5 tbsp)

Directions:

  1. Preheat oven to 350 F.
  2. In a large bowl, whip the butter until creamy, approximately 1 minute.  Add sugar and blend.  Add eggs, beating well after each one.  Add baking powder.  Add whiskey mixture and vanilla.   Add flour.  Refrigerate the dough for 30 minutes.
  3. On a lightly-floured surface, form a tbsp of dough into a ball then roll it into a 7-inch long rope (sprinkle dough with some flour if too sticky).  Take the two ends of the rope, join them then twist to form a braid (watch video on how to do this).
  4. Line 4 cookie sheets with wax paper.  Place cookie braids about 2 inches apart on the wax paper-lined trays and brush tops with the egg and milk mixture.  Sprinkle the top of each cookie with sesame seeds.
  5. Place two cookie sheets on the top rack of the oven and bake until tops of cookies are browned, approximately 10 minutes, then switch the cookie sheets from the upper oven rack to the bottom oven rack and bake an additional 10 minutes.  Repeat process with additional baking sheets.
  6. Take cookies out of the oven and cool for 2 minutes, then transfer them to a kitchen towel and cool completely.

Makes 48 cookies.

Notes:  You’ll need 4 cookie sheets for this recipe (can cool and wash the first 2 cookie sheets after the first batch of cookies have baked).  You’ll likely need to re-refrigerate the dough after you roll and braid enough cookies for 2 baking sheets.  Not into braiding?  Koulourakia can also be made into a circle using a 7-inch long rope!  Do not store cookies before they’ve cooled completed or they’ll lose their crunch.