Buffalo Cauliflower and Chicken Bake

Buffalo Cauliflower and Chicken Bake

I’ve been making a conscious effort to lower the amount of carbs I intake and always looking for, or coming up with, recipes that I can easily reheat for weeknight dinners.

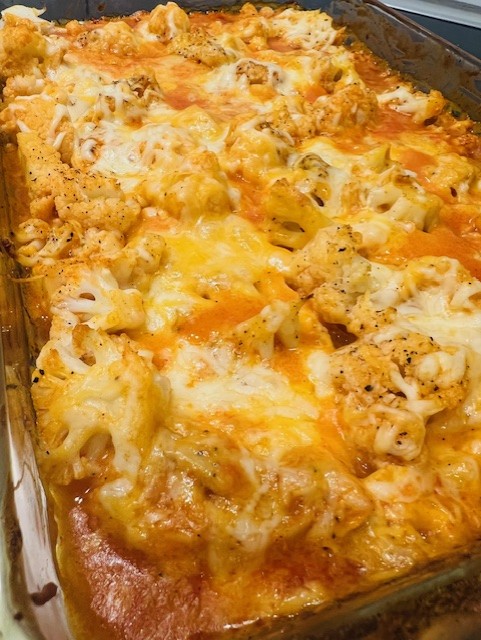
After the Big Game, I decided to try to make a simple-to-prepare cauliflower bake using the flavors of Buffalo wings. Since I only had a small head of cauliflower, I added some leftover roast chicken, but this could be made with just cauliflower for a meatless option.

After making this recipe on Sundays, I portion the mixture into four small meals for the week that I eat with celery and carrot sticks to keep things low carb. The mixture would be super served with crackers or tortilla chips also.

Ingredients:

  • 2 cups cooked chicken, diced or shredded
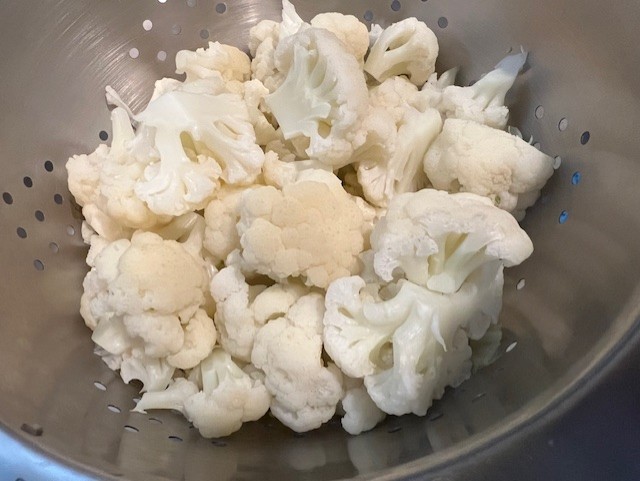
  • 1 medium head of cauliflower, cut into florets and blanched/steamed for 5 minutes
  • ½ cup blue cheese dressing (could use ranch dressing also)
  • 1 cup Buffalo sauce (I use Frank’s)
  • 1 cup each shredded Cheddar and Mozzarella cheese
  • ½ tsp. each salt and pepper
  • 3 green onions, chopped

Directions:

  1. Preheat oven to 400 degrees and coat a 9” x 13” baking dish with cooking spray.
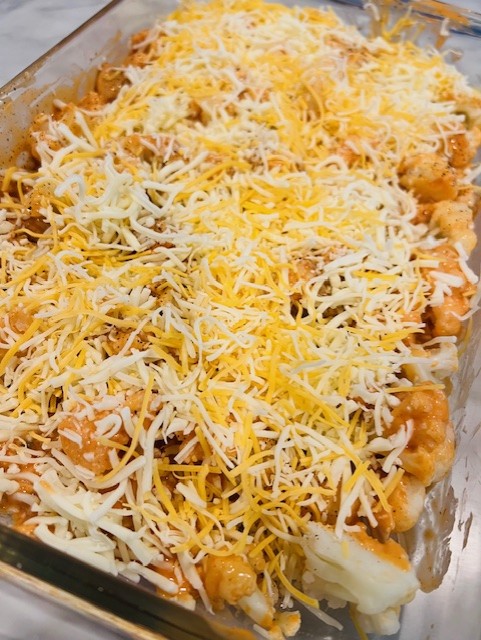
  2. In a large bowl, gently combine the chicken, cauliflower, blue cheese dressing, Buffalo sauce, ½ cup each Cheddar and Mozzarella cheese and salt and pepper.
  3. Add the mixture to the baking dish and sprinkle with the rest of the two cheeses.
  4. Bake for 20 minutes, until the cheese is melted.
  5. Sprinkle with chopped green onions and serve!

Yields about 5 cups.

Best Meatloaf Recipe Ever

Best Meatloaf Recipe Ever

If you’ve seen me cook, you know that I mostly use the “throw a little of this and a little of that” in the pan mentality.  Even when I use a family recipe as a guideline, I modify the ingredients, measurements and techniques to make the final dish my own (okay, I follow my grandma’s meat sauce recipe to the letter).

With this in mind, I tested Martha Stewart’s Meatloaf 101 recipe years ago and have never veered off from the original – it’s simply the best meatloaf I’ve ever eaten.  It’s all that a meatloaf should be: comforting, moist with a caramelized, crusty topping.  I’m willing to be proven wrong if you feel your favorite meatloaf recipe is better than this one.

While I often just make a meatloaf, I also like to divide up the mixture between a load fan and individual ramekins for one-serving mini meatloaves I freeze and thaw for weeknight dinners. The mini loaves I cook for 45 minutes.

Martha Stewart Meatloaf 101 (first published January 2006)

Ingredients:

  • 4 slices white bread, torn into pieces
  • 1 3/4 pounds ground beef
  • 3/4 pound ground pork
  • 1 medium yellow onion, peeled and cut into eighths
  • 2 cloves garlic
  • 2 stalks celery, cut into 2-inch pieces
  • 2 carrots, peeled and cut into 2-inch pieces
  • 1/2 cup fresh flat-leaf parsley
  • 1 large egg
  • 3/4 cup ketchup
  • 4 tsp. dry mustard
  • 1 Tbsp. coarse salt
  • 2 tsp. freshly ground pepper
  • 2 Tbsp. packed light-brown sugar

Directions:

  1. Preheat oven to 400 degrees. In the bowl of a food processor, pulse bread until fine crumbs form. Transfer to a medium bowl; add ground beef and ground pork.
  2. Place onion, garlic, celery, carrots, and parsley in food processor; pulse until finely chopped. Add to beef mixture; combine using your hands. Add egg, 1/2 cup ketchup, 2 teaspoons dry mustard, salt, and pepper; combine thoroughly, using your hands. Place in an 8 1/2-by-4 1/2-by-2 1/2-inch loaf pan.
  3. In a small bowl, combine the remaining 1/4 cup ketchup and 2 teaspoons dry mustard, and the brown sugar; stir until smooth.
  4. Brush mixture over top of the meatloaf. Place the pan on a baking sheet to catch drippings, and transfer to oven. Bake until a meat thermometer inserted in the center reaches 160 degrees, about 1 1/2 hours. (If the top of the meatloaf gets too dark, cover with foil and continue baking.) Let meatloaf stand 15 minutes before slicing.

Yields 8-10 servings.

Chunky Pistachio Pesto

Last weekend I found amazing wild caught king salmon at my local fish market and brought it home without a plan on how I’d cook it. I had leftover pistachios so decided to add them to my food processor with garlic, flat leaf parsley, olive oil, red pepper flakes and salt and pepper. With a few pulses, I had a chunky concoction with lovely herby/garlicky aromas – heavenly!

This pesto would be great on grilled chicken, roasted vegetables and just about anything. I eyeballed the ingredients, but this is a good estimation of the measurements.

Ingredients:

  • ½ cup unsalted pistachios
  • 2 small cloves of garlic (or a large one)
  • ½ cup olive oil
  • Big handful of flat leaf parsley, about 3/4 cup, stems included
  • ½ tsp. each red pepper flakes, salt and pepper
  • 1 tsp. red wine vinegar

Directions:

  1. Add all the ingredients to a food processor and pulse about 10 times, until mixture is well blended but still chunky.

Yields about 1/2 cup of pesto.

Kitchen Sink Cookies by Claire

I love so much when kids and teens show a passion for cooking or baking. Cooking and baking skills are becoming sort of a lost art these days and when my colleague Sarah brought on her 12 year-old daughter, Claire, on a video call we were having to show off her cookie sheet full of freshly baked cookies, I was beyond impressed.

Claire Baking

I’ve known about Claire’s love of baking for a while and it stems from her grandma, Chris, who’s an amazing baker. My passion for baking also comes from my grandma, so this little lady and her Kitchen Sink Cookies hit close to home for me.

Claire shared the recipe she used, Kitchen Sink Cookies (Panera Copycat), by popular food blogger, Melissa at Design N Eat Repeat and I’m adding it to my repertoire to try over the weekend.

Kitchen Sink Cookies

Here’s to all the young cooks and bakers out there!

Cheers,

Veronique

Broccoli and Cauliflower Soup

Broccoli and Cauliflower Soup

Broccoli and cauliflower are two vegetables my husband doesn’t like so while he was away recently, I took the opportunity to make a batch of this soup that I portioned for lunches during the week.

This Broccoli and Cauliflower Soup is great with the Cheddar or without and only features a touch of cream for a bit of extra richness. Cream could also be kept out if the extra calories or the dairy concern you.

Do you want a vegetarian soup? Simply use vegetable broth!

Ingredients:

  • 2 Tbsp. olive oil
  • 1 medium Spanish onion, chopped
  • 3 carrots, chopped or 1 cup shredded
  • 1 medium broccoli head, chopped into bite-size pieces
  • 1 medium cauliflower head, chopped into bite-size pieces
  • 1 tsp. each salt & pepper
  • ½ tsp. each thyme, garlic powder and onion powder
  • 32 ounces chicken or vegetable broth
  • ½ cup heavy cream, optional
  • 1 cup shredded sharp Cheddar

Directions:

  1. In a large saucepan over medium-high heat, warm the oil then sauté the onion and carrots for 3 minutes, stirring occasionally. Add the broccoli and cauliflower and cook, partially covered, an additional 5 minutes, stirring occasionally.
  2. Add the seasonings and broth. Simmer, partially covered, for 30 minutes.
  3. Purée in a blender or with an immersion blender until completely smooth, about 2 minutes. Return the puréed soup to a clean saucepan and gently heat for 2 minutes.
  4. Add the cream and/or Cheddar, if using, and warm for 2 minutes.
  5. Re-season with salt and/or pepper to taste.
  6. To serve, ladle soup into bowls.

Yields 6 servings.

Brown Sugar Crackle Top Cookies

Brown Sugar Crackle Top Cookies

I was recently invited to a holiday cookie exchange party where I had to bring dozens of cookies to swap with other ladies. While I have many delicious cookie recipes on the blog, I wanted to challenge myself with trying a new recipe that would yield several dozen cookies.

I came across a recipe that yields four dozen cookies by blogger, Bake or Break, for Brown Sugar Crinkle Cookies. I have a great recipe for Chocolate Crackle-Top Cookies, that I love, but brown sugar cookies!!?? I was in!

This is a link to the recipe: https://bakeorbreak.com/2012/04/brown-sugar-crinkles/

While I followed the instructions, I did use a 1 ½-inch ice cream scoop vs the 1-inch version proposed in the recipe. Because of this, the recipe yielded 40 cookies, vs 48.

Toasting the chopped pecans made a huge difference in how nutty the cookies tasted, don’t skip that step!

Don’t overbeat the batter, mix until the dough comes together then manually fold in the pecan pieces with a wooden spoon or spatula. Again, mix until the pecans are just incorporated.

Letting the dough chill in the fridge prior to scooping into balls is critical here so that the cookies hold their shape and don’t go flat and spread too much. I gave mine 45 minutes in the fridge.

When possible, I like to bake one cookie sheet at a time, which I did here also as I had a leisurely day to do the baking. I just think cookies bake more evenly that way. I totally get that it’s not always feasible though.

As the cookies were a little bigger than what was prescribed in the recipe, I baked them for 13 minutes and they were perfect.

Can’t imagine one person who wouldn’t love getting a box of these precious and delicious cookies for the holidays.

Happy baking! Veronique

Easy Pellet Smoker Pulled Pork

Easy Pellet Smoker Pulled Pork

I’m no professional when it comes to smoking, but I’ve developed certain skills at using my Recteq RT-590. One of the easiest things one can make on a pellet smoker is pulled pork using a pork shoulder, also known as pork butt or Boston butt.

With just a few ingredients and in just a few steps, you’ll have a solid product that can be used in many ways. We’re fond of tacos (see below)!

Ingredients

  • 6-8 lb. pork butt with the bone in
  • Yellow mustard
  • Homemade or store-bought BBQ rub, we like Pork Mafia and Revolution Barbecue both found on Amazon
  • Spray bottle filled with equal amounts of cola and apple juice
  • Squeeze bottle margarine, I use Parkay brand
  • Salt and pepper
  • Homemade bbq sauce, or store-bought BBQ sauce, we like Bone Suckin’ Sauce widely available

Directions:

  1. The night before your cook, pat dry the pork butt with paper towels, coat in yellow mustard and generously sprinkle rub over the mustard. Wrap the pork butt in shrink wrap and place in the refrigerator overnight.
  2. The morning of your cook, add pellets to your smoker and preheat to 250 degrees for about 10 minutes, or until blue smoke turns white-ish.
  3. Take the pork out of the fridge, sprinkle with a second layer of rub then allow to warm up a bit while you fill a metal or aluminum pan with water, coming up halfway up the pan. Place the water-filled pan on one side of the smoker, that’ll help keep the pork moist as it cooks, and place the pork butt on the other side, fat cap down. Insert the smoker’s probe, or a meat thermometer, inside the pork ensuring it doesn’t touch the bone, which will cause bad temp readings.
  4. Generously spray the pork with the cola/juice mixture every hour until the internal temp of the meat reaches 155 degrees.
  5. Place three large sheets of foil on a work surface and position the pork on the foil. Spray generously with the coke/apple juice and squeeze margarine all over the surface, you’ll need about ½ cup depending on the size of your pork butt. Wrap the pork tightly with the foil and place the probe/thermometer back in the meat. Put the pork back on the smoker and cook until the internal temp reaches 200 degrees.
  6. Take the pork out of the smoker, uncover the top and put the pork back on the smoker to finish creating the crunchy bark, about 30 minutes.
  7. Take the pork out and let it rest 15-20 minutes, remove the bone then shred and pull using two forks, or your gloved hands. Generously salt and pepper the meat then add a thin layer or BBQ sauce, about ½ – ¾ cup to lightly coat but not overwhelm the amazing pork flavor. Alternatively, you can omit the bbq sauce.

Yields 6-8 pulled pork sandwiches.

Note that the cooled pork freezes very well in freezer bags for up to a couple of months.

Salsa Verde Enchilada Sauce

Salsa Verde Enchilada Sauce

I love anything with flavors of lime and cilantro so when I’m out at a Mexican restaurant, I typically order enchiladas verde, enchiladas in green salsa. Salsa verde features tomatillos, garlic, onions, chiles and lime. I made my version by first roasting my veggies on the grill to get bits of char in the salsa. This process can also be done in a 450 degree oven.

Ingredients:

  • 1 pound peeled tomatillos, about 6 medium-sized tomatillos
  • 6 whole garlic cloves
  • 1 onion, cut into chunks
  • 1 large poblano pepper, seeded and chopped in large pieces
  • 3 Tbsp. olive oil
  • 1 tsp. each salt and pepper
  • 8 ounces chicken broth (can use vegetable broth)
  • Juice of 2 limes
  • 1 7-ounce can green chilis (I use La Preferida Mild Diced Green Chiles, Roasted & Peeled)
  • 2 Tbsp. chopped cilantro
  • Salt and pepper to taste

Directions:

  1. Place the tomatillos, garlic, onion and poblano in a bowl and add the olive oil, the salt and the pepper. Toss to fully coat. Place the veggies on a grill pan, or an outdoor grill, and roast on medium-high heat for about 10 minutes, turning to roast on all sides, until veggies have softened and show charred bits. If roasting in an oven, place the veggies on a baking sheet and roast for 15 minutes at 450 degrees.
  2. Place the roasted veggies in a blender or food processor (could use a stick blender) with the broth, lime juice, green chillis and cilantro. Blend until mostly smooth, about 15 seconds. Taste and re-season, if needed, to taste.

Makes about 3 cups salsa verde.

Smoked Swordfish with Avocado Salsa

Smoked Swordfish with Avocado Salsa

Growing up in South Florida, we ate a lot of swordfish. Then, there was over-fishing that nearly brought swordfish to extinction. Having overcome that situation, swordfish is back and I couldn’t be happy – I love it!

I’ve been thinking of things to make on my Rectec smoker and since swordfish has a meat-like texture, I thought it’d be a good candidate. The ‘recipe’ is very simple but the results are amazing.
If you don’t have a smoker, simply add some wood chips to your grill and grill with smoke.

I served the fish with a side of guacamole that I left very chunky, some lime and cilantro and it was a great pairing.

Ingredients:
• Two 6-ounce pieces of swordfish
• 1 Tbsp. Kosher salt, divided
• 2 Tbsp. olive oil
• 1 tsp. black pepper
• 1 Tbsp. Tony Chachere’s no salt seasoning (or your favorite Creole seasoning)
Cilantro Lime Rice (optional)
Zesty Guacamole or an avocado salsa
• Juice of half lime
• 1 tsp. cilantro (optional)

Directions:

  1. Place the swordfish on a plate and sprinkle with the Kosher salt. Place in the fridge for an hour.
  2. Take the fish out of the fridge and rinse the salt under running water. Pat the fish dry with paper towel.
  3. Coat the fish with oil and sprinkle with pepper and Tony’s.
  4. Bring the smoker up to 200 degrees, place the fish in it and smoke for 60 minutes.
  5. Bring a grill to medium/high heat and grill the fish on each side until internal temperature of the fish reaches 130 degrees.
  6. Serve with the rice, if using, the guacamole, a squeeze of lime and the cilantro, if using.

Makes two servings.

Blueberry Croissant French Toast Casserole

I love a recipe you can prep in advance that doesn’t require a lot of work once my guests arrive. Just love spending time with my guests vs having them speak at my back while I’m making food.

One such recipe is this Blueberry French Toast Casserole that’s prepared the evening prior to your brunch and pop in the oven to bake while you’re entertaining.

It’s blueberry season now so I’m using that berry, but this dish is also great with sliced strawberries or blackberries. I use Quebec maple syrup but use any good quality syrup. I like making this with buttery croissants, but brioche of challah bread would be great also.

Ingredients:

  • 12 cups croissants torn into bit size pieces (about 10 medium sized croissants)
  • 10 large eggs
  • 1 cup heavy cream, plus more for serving
  • 1 cup milk (not low-fat)
  • 1 Tbsp. pure vanilla extract
  • 1 tsp. ground cinnamon, optional
  • 2/3 cup light brown sugar
  • 1 1/2 cups blueberries
  • 1/2 tsp. lemon zest, optional
  • 1/2 cup maple syrup, plus more for serving
  • 2 Tbsp. confectionary sugar, optional

Directions:

  1. Butter or coat with cooking spray a 9″x13″ baking dish. Add the croissants pieces to the casserole. It might seem like a lot of croissants, but after they soak into the custard overnight, the mixture will shrink some.
  2. In a large bowl, combine eggs, 1 cup of cream, milk, vanilla extract, cinnamon (if using), and brown sugar. Whisk the mixture until fully blended, about 1 minute. Pour the mixture over the croissant pieces and push down on the croissant with a spatula to ensure all the pieces are soaking into the custard.
  3. Add the blueberries, lemon zest (if using) and drizzle with the maple syrup.
  4. Cover the baking dish with plastic wrap, or foil, and place in the refrigerator overnight or for at least 5 hours.
  5. When ready to bake, turn oven on to 350 degrees F, allow to preheat then place the casserole in the oven and bake for 40 minutes, or until the casserole top is golden brown (see pics for reference).
  6. Remove from the oven and allow to cool for 5-10 minutes before serving. Dust with confectionary sugar, if using.
  7. Serve with additional maple syrup and a drizzle of cream.

Makes 10 servings.

Cheers,

Veronique