Easy Garlic Confit

Easy Garlic Confit

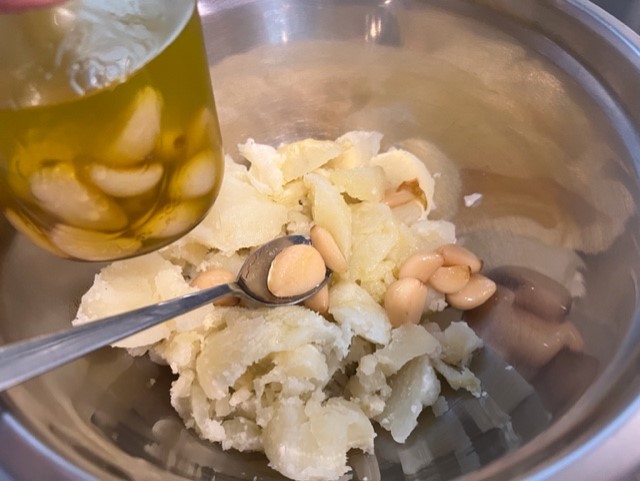
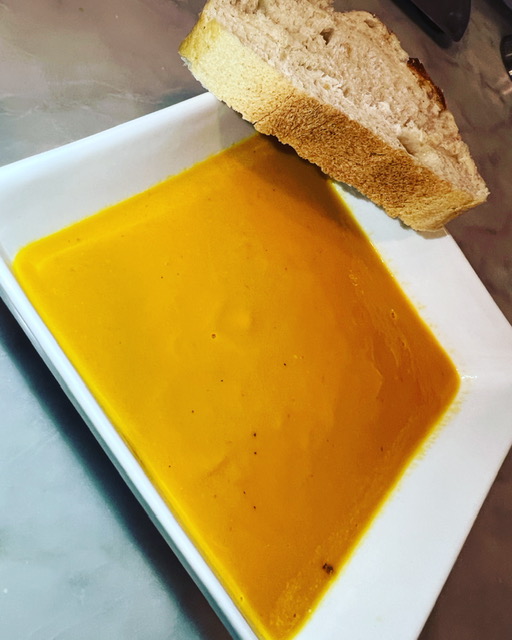
I have a jar of this fantastic concoction in the fridge at all times. I typically make it every couple of weeks and use the oil and the cloves in a variety of things ranging from adding to potatoes I’m mashing (see picture below) to simple crostini with smacked cloves and a drizzle of oil to adding to a tomato sauce for subtle sweet garlic taste.

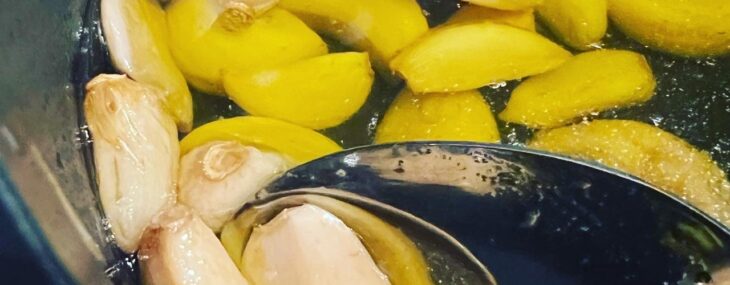
There’s not an actual recipe, add whole cloves to olive oil in a small pot and cook slowly. Couldn’t be easier!

Ingredients:

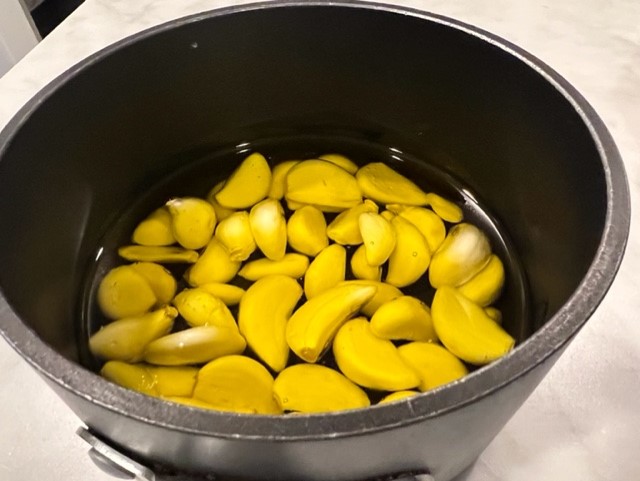
1 1/2 cups olive oil

Whole garlic cloves, I use about 40 for this quantity of oil, but lower the count for less oil

Adding cooked cloves to mashed potatoes

Directions:

Heat oil on low in a small saucepan, add the garlic and cook for 45 – 60 minutes until the cloves are soft.

Store in a glass container in the fridge for up to 10 days. I use a mason jar.

Enjoy!

Veronique

Horseradish Cream

Horseradish Cream

Horseradish cream is fantastic and you need it in your life. That’s all this post should really say. It’s a condiment that’s put together in a couple minutes and goes amazingly well with some many things, including my Reverse Seared Prime Rib.

Whip this up the day prior to using it as it develops its flavors over time, just cover your bowl in cling wrap and refrigerate.

Regarding the horseradish I use, I like the Silver Spring Horseradish brand as it’s fresh and hot. Make sure whatever brand you get, it’s the horseradish that’s refrigerated often referred to as “fresh”, “prepared” or “coarse”. I don’t recommend the kind found on grocery shelves store at room temperature for this preparation.

Ingredients:

  • 5 Tbsp. fresh prepared horseradish, drained
  • 1 cup sour cream
  • 6 Tbsp. mayonnaise (I use Duke’s)
  • 2 tsp. Worcestershire sauce
  • 2 tsp. freshly squeezed lemon juice (could use lime juice also)
  • ½ tsp. each salt and freshly-ground pepper

Directions:

  1. Combine and whisk all the ingredients together
  2. Refrigerate until ready to serve, up to a day ahead of serving

Yields 1 ½ cups cream.

Cheers, Veronique

Slow Cooker Ropa Vieja

Slow Cooker Ropa Vieja

I spend 20+ years in South Florida and love Cuban food, which is easy to find there and delicious. Since moving north, I’ve not found it in many places, and if I have, it just isn’t the same.

Ropa Vieja

I was so excited when one of the avid contributors to my Food & Wine Chickie Facebook page, Cathy, shared her recipe for Ropa Vieja, one of my favorite Cuban dishes. The dish is named Ropa Vieja as it translates to “old clothes”, a reference to the beef’s shredded/tattered appearance.

While there are many regional variations of this dish, the basic concept of that of braised flank steak with vegetables that’s cooked until the meat’s VERY tender and can easily be shredded. Cathy’s recipe is cooked in the slow cooker, so set it and forget it. In her recipe, she uses green and red bell peppers, but I prefer all red so the below reflects that…and I added garlic, cause everything’s better with garlic. Many remove the carrots before serving, but I like the sweetness of cooked carrots, so they stay in for me.

I serve my Ropa Vieja with white rice and black beans with a nice squeeze of lime. The meat is also AMAZING in tacos and freezes very well for a few months.

Ingredients”

  • 1 Tbsp. olive oil
  • 2 – 3-pound flank steak
  • 1 tsp. each salt and pepper
  • 1 red bell pepper, sliced
  • 1 small yellow onion, chopped
  • 1 6-ounce can tomato paste
  • 1 14-ounce can tomato sauce
  • 1 cup of water
  • 2 carrots, chopped
  • 5 garlic cloves, whole
  • 3 bay leaves
  • ½ cup olives with pimiento and ¼ cup of the juice they come in
  • 2 Tbsp. white vinegar
Flank Steak
Ropa Vieja Ingredients

Directions:

  1. Over medium-high heat, warm the olive oil in a skillet.
  2. Season the steak with salt and pepper and add to the hot skillet. Brown the meat on both sides, about six minutes total.
  3. Place the browned meat, then all the other ingredients, in the slow cooker. Cook on high for four hours (of 8 hours on low) or until meat is very tender and falling apart. 
  4. With two forks shred apart the meat into stringy strands.
  5. Serve over white rice.

Makes six servings.

Cheers,

Veronique

Carrot, Apple and Ginger Soup

Carrot, Apple and Ginger Soup

At our home, we make soup nearly every weekend when the weather’s cooler. While we have some favorites that we often default to, we also like to try new flavors to change things up.

Carrot, Apple and Ginger Soup

This week, I did a velvety, stellar carrot, apple and ginger soup that was absolute fall in a bowl.

This recipe is super simple to prepare with just a few ingredients. After simmering all the ingredients in vegetable broth, I puréed the mixture in my Vitamix until perfectly smooth.

The results were outstanding.

Soup Ingredients

Ingredients:

  • 3 Tbsp. olive oil
  • 1 medium onion, sliced
  • 4 cups peeled and sliced carrots
  • 2 Tbsp. chopped fresh ginger
  • 1 large garlic clove, chopped
  • 1 medium apple, peeled and diced (I used a Granny Smith)
  • 4 cups vegetable broth
  • Pinch of nutmeg
  • ½ tsp. each salt and pepper
  • ¼ cup heavy cream, optional 
Soup Simmering
Soup in Blender

Directions:

  1. In a large saucepan over medium heat, add the oil and warm for 1 minute.
  2. Add the onion and the carrot and sauté for 5 minutes, stirring frequently.
  3. Add the ginger, the garlic and the apple and sauté an additional minute.
  4. Add the broth and spices and simmer for 30 minutes.
  5. Pour the cooled mixture in a blender (could also use a food processor) and purée until very smooth. This may need to be done in two batches depending on the size of your blender.
  6. Pour the soup back in the saucepan over medium heat and bring back to a simmer. Turn off the heat and add the cream, if using.

Serves 6.

Cheers,

Veronique

Aperol Gin Cocktail

Aperol Gin Cocktail

My foodie pal Justin, who lives in New Jersey, is hilarious and sarcastic in the best possible way and he’s been a constant inspiration in my pursuit of craft cocktail mastery. I’ve been following his posts on Instagram (you must follow him too: https://www.instagram.com/justinelmini/) and recreating some of his libations since the start of the pandemic. The latest drink I’ve recreated of his is what I’m calling Aperol Gin Cocktail.

The Aperol Gin Cocktail is incredibly easy to make and is a fantastic drink to enjoy on a hot summer day and/or by the pool. While Justin serves his version up in a coupe, which is lovely, I served mine in a more typical Aperol stemmed glass over ice.

Aperol Gin Cocktail

Ingredients:
1 ounce Aperol
1 ounce Gin (I use Aviation)
1 ounce lime juice
1 ounce simple syrup
2 ounces sparkling or soda water
Thinly sliced lime for garnish

Directions:
Fill a cocktail shaker with ice and add the Aperol, gin, lime juice and simple syrup. Shake hard until the shaker is frosty and too cold to hold (if it’s metal), about 30 seconds.
Pour the drink and the ice into a large stemmed glass and top with the sparkling/soda water and a slice of limes.

Cheers, Veronique

Quebec Old Fashioned Doughnuts         

Quebec Old Fashioned Doughnuts         

Growing up in Quebec, many families had their traditional recipes for homemade doughnuts that they would make primarily around the holidays. Some families, especially the large ones, made doughnuts year around as they freeze well placed into freezer bags and can be thawed for impromptu visitors (or just because).

My mom made this giant batch of doughnuts today and I just had to share the yield she gets from that one recipe. These Quebec-style doughnuts, also called croquignoles, are cake like inside and perfectly crunchy from a quick dip in the fryer. The traditional method is to serve these plain or coated in granulated sugar, but the sky’s the limit with the various toppings to add – they’re a delicious blank canvas.

Check out my mom’s doughnut cutter. The benefit of using this type of cutter is that you also get doughnut holes that you can fry to deliciousness. A 4” in diameter glass would also work, but I’d recommend using a smaller cutter to cut a hole in each doughnut.

Ingredients:

  • 5 large eggs
  • 4 cups granulated sugar
  • 4 cups whole milk combined with 1 tsp. baking soda
  • ¼ Tbsp. salt
  • ½ tsp. vanilla extract
  • 10 cups of all-purpose flour combined with 8 tsp. baking powder (plus extra flour for rolling the dough)
  • ½ cup melted butter
  • Crisco or oil for frying
This is What This Recipe Yields

Directions the day prior to making the doughnuts:

  1. In the bowl of an electric mixer, beat the eggs and the sugar until light and fluffy, about 1 minute.
  2. Add the milk mixture, the salt and the vanilla and beat until combined, 30 seconds.
  3. Add the flour mixture, 2 cups at a time, until fully incorporated – don’t overmix.
  4. Add the butter and blend into the dough until fully incorporated.
  5. Cover the dough with cling wrap and refrigerate overnight.
Mom and Her Doughnuts

Directions for frying day:

  1. After the dough’s rested overnight, heavily dust a work surface with all-purpose flour. The dough will be quite sticky, so don’t be shy with the flour dusting.
  2. Divide the dough into 2 batches and place one portion onto the floured work surface. Knead the dough until it’s mostly no longer sticky – don’t over-knead as that’ll create tough doughnuts.
  3. Roll the kneaded dough using a rolling pin to about ½ inch in thickness for bigger doughnuts or ¼ inch in thickness for smaller doughnuts.
  4. Using a doughnut cutter (or a glass 4” in diameter), cut doughnuts out of the dough and place them on a wire rack until ready to fry. Repeat with the second portion of dough.
  5. Fill a large deep skillet or pan 1/3 of the way full of either Crisco or vegetable oil. Bring the oil to 375 degrees over medium-high heat.   
  6. Fry the doughnuts in batches so there’s no crowding in the pan. Bring the oil back up to temperature between each batch. Place the fried doughnuts on layers of paper towels to drain, then move to a wire rack to cool.

Yields about 10 dozen doughnuts.

Easy Pork Schnitzel

Easy Pork Schnitzel

My husband’s Dutch and loves a good schnitzel. We often make this popular German dish using veal or chicken, but perhaps our favorite version is to use pork tenderloin. Pork tenderloin isn’t a cut of meat I purchase often, like its beef counterpart, I just find it too low on fat to produce a juicy, dare I say moist, dish.

Pork Schnitzel

The crunchy exterior and ultra-tender meat are a perfect match for a great schnitzel. I typically serve our pork schnitzel with my Lemon Mustard Cream Sauce and lots of fresh lemons.

Ingredients:

  • 1 pork tenderloin cut into 2-inch-thick portions
  • 2 cups breadcrumbs, I like a mix of regular and Panko
  • 1 cup all-purpose flour, seasoned with 1/2 tsp. each salt and pepper
  • 2 large eggs, beaten
  • ½ cup vegetable oil for frying
  • Lemon Mustard Cream Sauce
  • 2 lemons, cut into quarters
Prepped Ingredients
Properly Coated Pork
Pork Frying
Pork Schnitzel with Lemon Mustard Cream Sauce

Directions:

  1. Place a pork medallion between two layers of plastic wrap and pound with a meat mallet to ¼ inch thick.
  2. Place the breadcrumbs on a plate.
  3. Place the flour on a separate plate.
  4. Scramble the eggs in a shallow dish.
  5. Warm the vegetable oil in a large deep skillet (I use my cast iron pan) over medium-high heat for about 2 minutes. You want the oil hotel so the pork gets crispy and not soggy.
  6. Dredge the pork into the flour to coat, then dip into egg mixture, back into the flour, back in the egg then finally in the breadcrumbs. Lightly pat the breadcrumbs on to ensure a good coating.
  7. Place the coated pork into the hot oil and fry 3 to 4 minutes. Flip the pork and cook and additional 3 minutes, or until the pork is browned and crisp. Fry in batches so the pan doesn’t get crowded causing the oil to cool too much.
  8. Serve hot with the Lemon Mustard Cream Sauce lemon wedges.

Makes two generous portions or up to four if you serve the schnitzel with a starch like mashed potatoes, rice or buttered noodles.

Lemon Mustard Cream Sauce

Lemon Mustard Cream Sauce

This lemon and mustard cream sauce is perfect on basically everything. I originally made this easy mustard sauce to put on a pork schnitzel dish, but it’s equally great on fish and chicken. It’s creamy from the béchamel, tangy from the lemon juice and mustard, and a little licoricey from the tarragon.

Ingredients:

  • 2 Tbsp. butter
  • 2 Tbsp. all-purpose flour
  • 1 Tbsp. Dijon mustard
  • 1 Tbsp. coarse ground mustard (could also use 2 tablespoons of Dijon mustard instead of 1 tablespoon each Dijon and ground mustard)
  • Juice of half a lemon
  • 1 cup heavy cream
  • 1 cup chicken broth
  • ¼ tsp. each black pepper, salt and tarragon

Directions:

  1. In a medium saucepan over medium heat, melt the butter. Add the flour, whisking constantly, and cook for 2 minutes.
  2. Add the mustards and lemon juice, whisk well and continue to cook for 1 minute.
  3. Add the cream, chicken broth and spices, whisking until the mixture comes to a simmer. Reduce the heat to medium-low and cook for about 20 minutes, until the sauce has thickened.

Yield: 1 ½ cups.

Reverse Seared Roasted Prime Rib

Reverse Seared Roasted Prime Rib

This is the ultimate prime rib technique. I’ve used it the last two Christmases and it produced superior results and I highly recommend it. I very skeptical when I saw the beef would roast at 150 degrees Fahrenheit, but, it’s simply brilliant.

Reasons to love this technique:

  1. Set it and forget it for five ½ – six ½ hours!
  2. It comes out of the oven and MUST rest for 45-60 minutes allowing you to use the oven for other purposes, like making Fail Proof Yorkshire Puddings.
  3. The slow and low temperature creates a perfect cook from edge to edge. No more bullet of raw beef in the center and gray/overcooked meat on the outside.
  4. As long as you keep the cooked beef covered loosely in foil, you can determine the exact time you’ll serve dinner because all you need before slicing is 10 minutes in the hot oven. This is awesome!

Technique:

  1. This works with a bone-in (a must), well-marbled prime rib from three-12 pounds. I typically make a four to five-pound roast to feed four-six people.
  2. The day prior to your dinner party, take the beef out of the packaging and place on a rack in a roasting pan and place in the fridge uncovered.
    • The early morning of your dinner, apply a very generous coating of black pepper and kosher salt to the roast and put back in the fridge until ready to cook.
    • Two hours before cooking, take the roast out of the fridge to allow to come to room temperature.
    • Place the roast, still on the rack in the roasting pan, in a 150-175 degree Fahrenheit oven (some ovens won’t stay on at 150 degrees, so raise to 175 degrees if that happens). I cook mine at 150 degrees. Place an instant-read thermometer in the center of the roast (make sure it doesn’t touch a bone). Cook for five ½ – six ½ hours, until the thermometer reads 120 degrees for rare, 130 for medium-rare or 135 for medium. Anything more cooked than medium is a sin, don’t be sinful. For a five-pound roast, mine took just over 6 hours.
    • Once the roast reaches the desired temp, 120 degrees at my home, take out of the oven and tent it loosely with foil. Allow the roast to rest for 45-60 minutes.
    • Raise the oven temp to 500 degrees and place the roast back in the oven, without the foil, for 10 minutes to crisp up on the outside. I only crisped mine up for seven minutes, but will go the full 10 next time for a deeper brown color.
    • Serve at once!
    See the ‘crust’ that forms from sitting overnight in the fridge?
    Look at the yummy crust!

    The fabulous person whose method this is, is J. Kenji López-Alt, a stay-at-home dad who’s moonlighted as a culinary consultant of Serious Eats. Read all about the fascinating testing he did to come up with this perfect method on Serious Eats. This guy’s changed my Christmas dinners forever and I’m very grateful!

    Please let me know how your prime rib turns out when you try this method!

    Cheers,

    Veronique

    Josee’s Beef Stroganoff

    Josee’s Beef Stroganoff

    In our family, my sister makes the very best beef stroganoff. Hers is the recipe my grandma used and it’s rich, comforting and perfect on a cool night.

    Beef Stroganoff was invented and named after Count Stroganoff, a member of a Russian elite family, by his personal chef.

    In the original recipe, beef bouillon granules are added to boiling water to create a broth. I’m simply using beef broth and it’s an adequate substitute.

    Serve this dish the day after making it as it gets better as it sits. You just need a side of long grain white rice for a perfect pairing.

    Ingredients:

    • 2-pound sirloin, sliced into 2” strips
    • 4 Tbsp. all-purpose flour
    • 1 small onion, diced
    • 1/2-pound mushrooms, sliced
    • 3 Tbsp. butter
    • 1/4 cup vegetable oil
    • 2 cups hot beef broth
    • 3 Tbsp. Worcestershire sauce
    • 3 Tbsp. tomato paste
    • 1 tsp. salt
    • 1/2 tsp. black pepper
    • 2 bay leaves
    • 1/ tsp. thyme
    • 1 cup sour cream
    • Cooked white rice
    Cut Beef Into Strips
    Sprinkle Beef with Flour
    Sauté Beef
    Add Broth to Beef
    Beef Stroganoff Simmering

    Directions:

    1. Coat the beef strips with the flour, set aside.
    2. In a medium Dutch oven or heavy pot, sauté the onion and mushrooms with the butter over medium heat until softened, about 5 minutes, stirring frequently.
    3. While the vegetables cook, in a large heavy skillet, heat the oil over medium-high heat. Add the beef strips and cook for about 5-7 minutes until the beef has browned, stirring a few times to prevent scorching. Add the hot broth to the beef and stir to scrape down any brown bits from the bottom of the pan. Cook for 1 minute.
    4. Add the broth and beef to the vegetables and stir to combine.
    5. Add the Worcestershire sauce and tomato paste and stir to combine.
    6. Add the spices and the sour cream and stir again to combine.
    7. Lower the heat to low, cover and simmer for 2 1/2 – 3 hours, stirring occasionally, until the beef is tender.
    8. Serve with rice

    Makes 4-6 servings depending on how hungry your family is.